Jan 30, 2011

Remote management on KVM with SSH

When we set up virtual machines with libvirt/KVM on production environments, it is typical that the operating system where we want to create the virtual machines, it does not have a graphical user interface as Gnome or KDE, where we can run the Virtual Machine Manager in order to make or handle them.

For this reason, it is necessary to connect it remotely through Virtual Machine Manager so as to set up new virtual machines where a graphical wizard is required.

In this article, we are going to establish a connection over SSH from a Kubuntu 10.10 to a KVM hypervisor located on an Ubuntu Server 10.10. In this way, the libvirt management connection will be securely tunneled over an SSH connection.

In the following figure, you can see the needed packages which must be installed on each computer. Remember that I already presented a series of articles related to KVM virtualization (I, II, III and IV).


First of all, we must start the libvirtd daemon on the Ubuntu Server. We will also ensure that in successive starts, the daemon will run automatically.

javi@ubuntu-server:~$ sudo service libvirt-bin start

javi@ubuntu-server:~$ sudo update-rc.d libvirt-bin defaults

Then, we must generate a public key pair on the computer (kubuntu) where the Virtual Machine Manager (virt-manager package) will be used. In the next step, we have to copy the keys to the machine (ubuntu-server) where libvirtd will be running.

javi@kubuntu:~$ ssh-keygen -t rsa

javi@kubuntu:~$ ssh-copy-id -i ~/.ssh/id_rsa.pub javi@ubuntu-server

In the previous output, we have copied the keys to the javi user home, where 'javi' is a simple user (no root) of ubuntu-server with rights to manage libvirt (by default, any user belonging to libvirtd group can handle libvirt).

And finally, we only have to to make a remote connection over SSH from the Virtual Machine Manager to the hypervisor located on the Ubuntu Server.


Jan 23, 2011

Shrinking virtual disks with LVM

It is possible that what I am going to tell next can be done in other ways, but I am really sure that it will be very useful for many people. Have you ever thought how to reduce a virtual disk on VMware, KVM, Xen, etc. with a Linux filesystem created inside?

If the virtual disk just contains a filesystem such as ext3, ext4, btrfs, etc., the solution is easy: use any partition tool like GParted, shrink the partition or partitions and copy them to another virtual disk smaller.

But what happens if that virtual disk has a filesystem over a Logical Volume (LV)? The solution is not trivial, since partion tools do not support Logical Volume Management (LVM).

Then I am going to explain my solution. For my tests, I will use a CentOS 5.5 virtual machine under VMware vSphere, with a virtual disk of 64 GB (sda). That virtual disk will have two partitions: sda1 (107 MB) and sda2 (63,88 GB).

[root@centos ~]# fdisk -l

Disco /dev/sda: 68.7 GB, 68719476736 bytes
255 heads, 63 sectors/track, 8354 cylinders
Unidades = cilindros de 16065 * 512 = 8225280 bytes

Disposit. Inicio    Comienzo      Fin      Bloques  Id  Sistema
/dev/sda1   *           1          13      104391   83  Linux
/dev/sda2              14        8354    66999082+  8e  Linux LVM

The second partition (sda2) will have two LVs, LogVol00 (data area) and LogVol01 (swap).

[root@centos ~]# lvs
LV       VG         Attr   LSize  Origin Snap%  Move Log Copy%  Convert
LogVol00 VolGroup00 -wi-ao 62,88G              
LogVol01 VolGroup00 -wi-ao  1,00G

My goal will be to decrease the size of the virtual disk from 64 GB to 19 GB.


In order to be able to resize the ext3 filesystem, LV, VG (Volume Group), PV (Physical Volume) and sda2 partition, you must boot the computer in rescue mode (using for example a Live CD).

boot: linux rescue

During the boot process, we will not mount the existing Linux installation and skip directly to the command shell. Then, we have to activate all known volume groups in the system and check the filesystem to rule out possible errors on it.

sh-3.2# lvm vgchange -a y

sh-3.2# e2fsck -f /dev/VolGroup00/LogVol00

Afterwards, first we must resize the filesystem from 62,88 GB to 16 GB and then, the LV.

sh-3.2# resize2fs /dev/VolGroup00/LogVol00 16G

sh-3.2# lvm lvresize --size 16G /dev/VolGroup00/LogVol00

Because we have reduced the LogVol00 size, now there is a gap between both volumes and it is better that we remove LogVol01 and recreate it again.

sh-3.2# lvm lvremove /dev/VolGroup00/LogVol01

sh-3.2# lvm lvcreate --size 1G --name LogVol01 VolGroup00

sh-3.2# mkswap /dev/VolGroup00/LogVol01

Next step is to decrease the size of the PV. We need 16 GB for the data area and 1 GB for the swap.

sh-3.2# lvm pvresize /dev/sda2 --setphysicalvolumesize 17G
/dev/sda2: cannot resize to 511 extens as 544 are allocated.
0 physical volume(s) resized / 1 physical volume(s) not resized

We can see that we must fit correctly that space... it is easy, a simple rule of three (17*544/511).

sh-3.2# lvm pvresize /dev/sda2 --setphysicalvolumesize 17.03G
Physical volume "/dev/sda2" changed
1 physical volume(s) resized / 0 physical volume(s) not resized

And finally, we have to resize that sda2 partition. To calculate the end sector, first we must take a look at the partition map in sectors (one sector is 512 bytes), get the starting point of the sda2 partition (208845s), add it the size of the PV (35651584s) and also add a security margin of around 64 MB (131072s).

sh-3.2# lvm pvs --units s
PV         VG         Fmt  Attr PSize     PFree
/dev/sda2  VolGroup00 lvm2 a-   35651584S    0S

sh-3.2# parted /dev/sda unit s print
Disk /dev/sda: 134217727s
Sector size (logical/physical): 512B/512B
Partition Table: msdos

Number  Start    End         Size        Type     File system  Flags
1      63s      208844s     208782s     primary  ext3         boot
2      208845s  134207009s  133998165s  primary               lvm

Now we can resize the partition: 208845 + 35651584 + 131072 = 35991501.

sh-3.2# parted /dev/sda rm 2

sh-3.2# parted /dev/sda mkpart primary 208845s 35991501s

sh-3.2# parted /dev/sda set 2 lvm on

sh-3.2# parted /dev/sda print
Disk /dev/sda: 68.7GB
Sector size (logical/physical): 512B/512B
Partition Table: msdos

Number  Start   End     Size    Type     File system  Flags
1      32.3kB  107MB   107MB   primary  ext3         boot
2      107MB   18.4GB  18.3GB  primary               lvm

It is necessary check again the filesystem to see that all is right.

sh-3.2# e2fsck -f /dev/VolGroup00/LogVol00

Now we have to add a second virtual disk (19 GB) to the system and copy the data from sda to sdb.

sh-3.2# dd if=/dev/sda of=/dev/sdb bs=1M &

When the task is complete, we must turn off the virtual machine, delete the first virtual disk (64 GB) and put the second (19 GB) as primary for the next boot.


Then we will finish starting the virtual machine.


Jan 17, 2011

Proxmox VE cluster

Other interesting feature related to Proxmox VE is the possibility to join all Proxmox VE installations in an unique cluster which centralizes and manages all virtual machines. Besides, we will also be able to move the virtual instances between Proxmox VE nodes.

In the following tests we are going to set up a cluster using two Proxmox VE 1.7 servers (proxmox1.local, with IP address 192.168.122.211/24 and proxmox2.local, with IP address 192.168.122.212/24). The two Proxmox VE nodes will be two virtual machines running under KVM.

The cluster setting does not support web management, therefore the only way is to utilize the bash console (pveca command).

First of all, we have to define the master node (for instance proxmox1.local).

proxmox1:~# pveca -c
cluster master successfully created

proxmox1:~# pveca -l
CID----IPADDRESS----ROLE-STATE--------UPTIME---LOAD----MEM---DISK
1 : 192.168.122.211 M     A           00:13   0.00    16%    20%

Now we can add new slaves to the master. In our case, we will assign one only node to the cluster, proxmox2.local.

proxmox2:~# pveca -a -h 192.168.122.211
cluster node successfully created

proxmox2:~# pveca -l           
CID----IPADDRESS----ROLE-STATE--------UPTIME---LOAD----MEM---DISK
1 : 192.168.122.211 M     A           00:23   0.00    18%    20%
2 : 192.168.122.212 N     A           00:23   0.00    17%    20%

If we open a web browser for the master node, we will be able to see in the main screen the cluster state.


If we want to make a virtual machine, we will be able to choose the server where the virtual machine will be created.


Other useful orders provided by the pveca command are the next:

proxmox2:~# pveca --help
...
pveca -s [-h IP]     # sync cluster configuration from master (or IP)
pveca -d ID          # delete a node
pveca -m             # force local node to become master
pveca -i             # print node info (CID NAME IP ROLE)

And finally, we also have the option of live migration in order to move virtual machines between physical servers. This is an interesting characteristic because in this way, we can locate a virtual machine in other Proxmox node with better hardware, or simply for maintenance tasks.

For example, we are going to imagine that we have a CentOS 5 virtual machine installed on proxmox1.local, and we want to migrate it to proxmox2.local.


For this purpose, we have to open VM Manager, Virtual Machines section and select the Migrate tab. Then, we must select the source and target nodes and the VMID to migrate and press the migrate button (the virtual machine to be moved can be turned on).


Jan 11, 2011

ufw (uncomplicated firewall)

Uncomplicated firewall (ufw) is the default tool included on Ubuntu distributions used to secure all incoming, outgoing and internal network traffic, providing appropiate IPv4 and IPv6 rules based on iptables.

Its files and directories structure is showed then (I have used an Ubuntu Server 10.10 for the tests).

root@ubuntu-server:~# tree /etc/ufw/
/etc/ufw/
├── after6.rules
├── after.rules
├── applications.d
│   └── openssh-server
├── before6.rules
├── before.rules
├── sysctl.conf
└── ufw.conf

By default, the firewall is disabled. So as to enable it, you must run the following order. If you want to turn off the firewall, you must add the disable parameter.

root@ubuntu-server:~# ufw enable
root@ubuntu-server:~# ufw disable

root@ubuntu-server:~# ufw status verbose
Estado: activo
Acceso: on (low)
Por defecto: deny (Entrada), allow (Salida)

With the 'status verbose', we can see that the default policy is to deny for incoming traffic and to allow for outgoing traffic. We can also change these default policies:

root@ubuntu-server:~# ufw default allow|deny|reject incoming|outgoing

Now we are going to view several examples. For instance, to set up a rule in order to allow the incoming mail traffic (any of the three possibilities is valid - the service names are declared into the /etc/servicies file).

root@ubuntu-server:~# ufw allow 25

root@ubuntu-server:~# ufw allow 25/tcp

root@ubuntu-server:~# ufw allow smtp

To remove the rule:

root@ubuntu-server:~# ufw delete allow 25

To add a rule in a specific position (fourth in the following example):

root@ubuntu-server:~# ufw insert 4 allow 22

To define the protocol, the source and destination addresses in order to deny certain traffic:

root@ubuntu-server:~# ufw deny proto esp from 192.168.1.0/24 to any


With ufw you can also specify the log level (the traces will be dumped to the syslog file with low level by default).

root@ubuntu-server:~# ufw logging on|off|LEVEL

LEVEL can be off, low, medium, high and full.

Another interesting feature of ufw is the possibility to define applications. For example, I am going to create an application named 'myapps' with a series of services:

root@ubuntu-server:~# vim /etc/ufw/applications.d/myapps
[myapps-1]
title=My applications
description=my applications: Artifactory, Hudson, Sonar, Redmine, actiTIME, Daisy
ports=8081,8080,9000,3000,7000,8888/tcp

Then I have to update the firewall with that profile information.

root@ubuntu-server:~# ufw app update myapps-1

And finally, I can already set new rules using this application.

root@ubuntu-server:~# ufw allow from 10.0.0.0/8 to any app myapps-1

In order to list all applications or to show information about a certain profile, we can run the following commands:

root@ubuntu-server:~# ufw app list

root@ubuntu-server:~# ufw info myapps-1


Jan 4, 2011

Making virtual machines with Proxmox VE

In the previous article, I presented Proxmox Virtualization Environment, a professional virtualization platform used to make virtual machines based on KVM and OpenVZ technologies.

Today we are going to learn how you can rapidly create a virtual machine from an OpenVZ template (I cannot utilize KVM because I have installed Proxmox VE 1.7 on a KVM/libvirt virtual machine and therefore, that virtual CPU does not have Intel VT / AMD-V support. Don't worry because the KVM process is similar to OpenVZ).

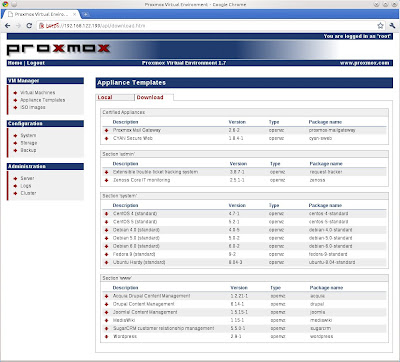
First, we have to open the VM Manager, Appliance Templates section and select the Download tab. Here you can see a list of templates ordered by means of different categories: certified appliances, admin, system and web. Also we can get more OpenVZ templates from lots of web sites and manually upload them to the Proxmox VE data area.


In my test, I am going to choose a CentOS 5 (standard) distribution and download it since Proxmox VE.

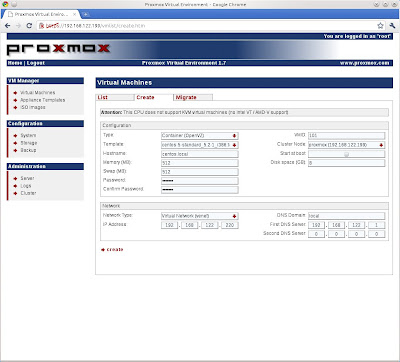
Afterwards we have to move to the VM Manager, Virtual Machines, Create section and fill the several fields that you can look in the following figure.


Most of the options are also typical in other virtualization products: hostname, memory, disk space, etc., but I am going to stress two: on the one hand we have the type of virtual machine; I picked out Container (OpenVZ) because it is the only allowed option due to the virtual CPU issue that I commented before. And on the other we must select the sort of network for our virtual machine.

With Proxmox VE you have got two option for the network devices: Virtual Network (venet) or Bridged Ethernet (veth). Basically, venet (virtual network device) provides a point-to-point connection between the guest and the host with better performance and more security, but on the contrary, there is no MAC address and full support of IPv6 stack regarding veth (Virtual eTHernet). In the next article, you can read more information about this topic: Differences between venet and veth.

And finally, we must press the create button and in a few seconds, we will have our virtual machine totally created and perfectly working.

In order to launch it, we must go to the VM Manager, Virtual Machines, List section, make click on the virtual machine that we want to turn on, and press the Start button. In this area we will be able to change different components of the virtual machine.


The Open VNC console option is used to pop up a new window with graphical access to the virtual machine.