Jan 11, 2011

ufw (uncomplicated firewall)

Uncomplicated firewall (ufw) is the default tool included on Ubuntu distributions used to secure all incoming, outgoing and internal network traffic, providing appropiate IPv4 and IPv6 rules based on iptables.

Its files and directories structure is showed then (I have used an Ubuntu Server 10.10 for the tests).

root@ubuntu-server:~# tree /etc/ufw/
/etc/ufw/
├── after6.rules
├── after.rules
├── applications.d
│   └── openssh-server
├── before6.rules
├── before.rules
├── sysctl.conf
└── ufw.conf

By default, the firewall is disabled. So as to enable it, you must run the following order. If you want to turn off the firewall, you must add the disable parameter.

root@ubuntu-server:~# ufw enable
root@ubuntu-server:~# ufw disable

root@ubuntu-server:~# ufw status verbose
Estado: activo
Acceso: on (low)
Por defecto: deny (Entrada), allow (Salida)

With the 'status verbose', we can see that the default policy is to deny for incoming traffic and to allow for outgoing traffic. We can also change these default policies:

root@ubuntu-server:~# ufw default allow|deny|reject incoming|outgoing

Now we are going to view several examples. For instance, to set up a rule in order to allow the incoming mail traffic (any of the three possibilities is valid - the service names are declared into the /etc/servicies file).

root@ubuntu-server:~# ufw allow 25

root@ubuntu-server:~# ufw allow 25/tcp

root@ubuntu-server:~# ufw allow smtp

To remove the rule:

root@ubuntu-server:~# ufw delete allow 25

To add a rule in a specific position (fourth in the following example):

root@ubuntu-server:~# ufw insert 4 allow 22

To define the protocol, the source and destination addresses in order to deny certain traffic:

root@ubuntu-server:~# ufw deny proto esp from 192.168.1.0/24 to any


With ufw you can also specify the log level (the traces will be dumped to the syslog file with low level by default).

root@ubuntu-server:~# ufw logging on|off|LEVEL

LEVEL can be off, low, medium, high and full.

Another interesting feature of ufw is the possibility to define applications. For example, I am going to create an application named 'myapps' with a series of services:

root@ubuntu-server:~# vim /etc/ufw/applications.d/myapps
[myapps-1]
title=My applications
description=my applications: Artifactory, Hudson, Sonar, Redmine, actiTIME, Daisy
ports=8081,8080,9000,3000,7000,8888/tcp

Then I have to update the firewall with that profile information.

root@ubuntu-server:~# ufw app update myapps-1

And finally, I can already set new rules using this application.

root@ubuntu-server:~# ufw allow from 10.0.0.0/8 to any app myapps-1

In order to list all applications or to show information about a certain profile, we can run the following commands:

root@ubuntu-server:~# ufw app list

root@ubuntu-server:~# ufw info myapps-1

Jan 4, 2011

Making virtual machines with Proxmox VE

In the previous article, I presented Proxmox Virtualization Environment, a professional virtualization platform used to make virtual machines based on KVM and OpenVZ technologies.

Today we are going to learn how you can rapidly create a virtual machine from an OpenVZ template (I cannot utilize KVM because I have installed Proxmox VE 1.7 on a KVM/libvirt virtual machine and therefore, that virtual CPU does not have Intel VT / AMD-V support. Don't worry because the KVM process is similar to OpenVZ).

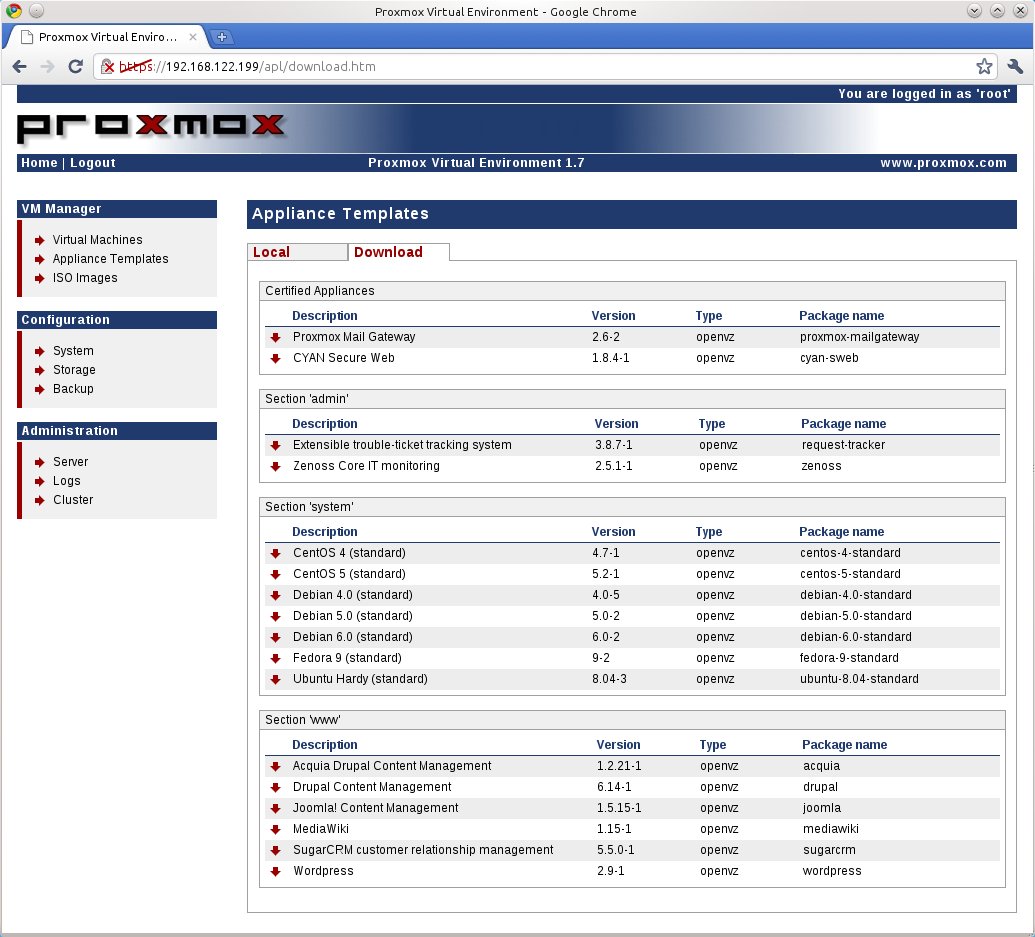
First, we have to open the VM Manager, Appliance Templates section and select the Download tab. Here you can see a list of templates ordered by means of different categories: certified appliances, admin, system and web. Also we can get more OpenVZ templates from lots of web sites and manually upload them to the Proxmox VE data area.


In my test, I am going to choose a CentOS 5 (standard) distribution and download it since Proxmox VE.

Afterwards we have to move to the VM Manager, Virtual Machines, Create section and fill the several fields that you can look in the following figure.


Most of the options are also typical in other virtualization products: hostname, memory, disk space, etc., but I am going to stress two: on the one hand we have the type of virtual machine; I picked out Container (OpenVZ) because it is the only allowed option due to the virtual CPU issue that I commented before. And on the other we must select the sort of network for our virtual machine.

With Proxmox VE you have got two option for the network devices: Virtual Network (venet) or Bridged Ethernet (veth). Basically, venet (virtual network device) provides a point-to-point connection between the guest and the host with better performance and more security, but on the contrary, there is no MAC address and full support of IPv6 stack regarding veth (Virtual eTHernet). In the next article, you can read more information about this topic: Differences between venet and veth.

And finally, we must press the create button and in a few seconds, we will have our virtual machine totally created and perfectly working.

In order to launch it, we must go to the VM Manager, Virtual Machines, List section, make click on the virtual machine that we want to turn on, and press the Start button. In this area we will be able to change different components of the virtual machine.


The Open VNC console option is used to pop up a new window with graphical access to the virtual machine.


Dec 28, 2010

Proxmox Virtualization Environment

Proxmox VE is an open source virtualization platform based on Linux and used to run virtual appliances and virtual machines. It is a product aimed at companies and production environments, since it intends to be an easy deployment and management solution.

Proxmox VE supports three types of virtualization technologies:

  • Container virtualization (OpenVZ): it allows that a physical server can run multiple insolated operating system instances as well known as containers. Its main problem is these containers or guests can just be Linux instances. However, the OpenVZ kernel provides better performance (penalty between 1% and 3% compared to a standalone server) in contradistinction to other alternatives.

  • Full virtualization (KVM): it can run Linux and Windows guests but unlike OpenVZ, Intel VT or AMD-V CPU is needed.

  • Paravirtualization (KVM): it presents a software interface similar to the underlying hardware in order to try to reduce the execution time of certain operations.

In my personal opinion, I think that OpenVZ is a plus because it has got better performance than KVM and the containers idea is fantastic: the size of these templates is really small and you can get a ready virtual machine in few minutes.

You can install Proxmox VE from an ISO image or directly on an existing Debian distribution (32 or 64 bits). I have tested Proxmox VE 1.7 (bare-metal ISO installer based on Debian Lenny) on a KVM virtual machine under my Kubuntu 10.10.

The process is very simple. The Proxmox installer is based on a graphical wizard with several stages: location and time zone selection, password and email address definition, and network configuration.

What are the main features of this product?

  • Web based administration: easy deployment and management (web based management and virtual console, backup and restore with LVM2 snapshots, etc.).

  • Virtual appliances: they are fully pre-installed and pre-configured applications including the operating system environment. You can create your own container, get from the community, use Linux OS instances or buy certified appliances.

  • Proxmox VE cluster: it allows to gather multiple physical server in one VE cluster (central web management and login, cluster synchronization, easy cluster setup, live migration of virtual machines between physical servers, etc.).

When you finish the installation process, you must reboot the machine and update the system.

proxmox:~# aptitude update ; aptitude dist-upgrade

In order to manage Proxmox VE, you must open a web browser and type the IP address configured during the wizard (the default user is 'root').


The Proxmox web interface is very useful. It is formed by three principal sections, VM Manager, Configuration and Administration.

In the VM Manager area, you can upload ISO images and OpenVZ templates, download certified appliances and create and handle virtual machines.

In the Configuration area, you can set up the different parameters of the system (network, DNS, time, administrator options, language, proxy, etc.), add and manage data storages (ISCSI targets, NFS shares, LVM groups and directories) and create new backup jobs.

And finally, in the Administration area you can control the Proxmox VE certificates and services (ClusterSync, ClusterTunnel, NTP, SMTP, SSH and WWW), take a look at the logs and monitor the cluster nodes.


Dec 22, 2010

Frag needed and DF set

I was remembering a curious problem that we had at work the last year.

There was an HTTPS service that when you tried to access it by means of a web browser, the screen did not show anything. The display was blank waiting...

The main inconvenience was that we had not access to the web server to check it out. At that moment, I ran a tcpdump on the client in order to capture all network traffic and try to find out what was happening.

When I analyzed the packets I could see that the TCP connection was established correctly but then, the web server was sending frames with "TCP Previous segment lost", "TCP Dup ACK", "TCP Retransmission" messages. It is a pity because I do not keep these network captures to output them here...

Well, then it was clear that there was some device in the middle of the route between client and server, which was causing a leak of network packets in that communication.

Our network architecture was similar to the schema of the following image.


Taking a look at the firewall logs, we could see that there were ICMP packets related to the problematic HTTPS connection which were being dropped.

The router was sending ICMP packets (type 3, destination unreachable - code 4, fragmentation needed) to the source, in order to warn it that its MTU was smaller than the size of the packets, and on top of all that, the DF (prohibit fragmentation) was set to 1.

When that ICMP packet reached to the firewall, it was dropped and the source never knew that it had to reduce the data field for the TCP/IP packets. The solution was to allow the ICMP traffic (ICMP protocol with type 3 and code 4).

We can realize a little test in our computer. For example, attempting to send a packet whose size exceeds our network MTU (1500) and besides, DF=1 (192.168.1.100 is my PC and 192.168.1.1 the destination).

javi@kubuntu:~$ ping -c 1 -s 2000 -M do 192.168.1.1 PING 192.168.1.1 (192.168.1.1) 2000(2028) bytes of data.
From 192.168.1.100 icmp_seq=1 Frag needed and DF set (mtu = 1500)

If I run a tcpdump, I can see that I receive an ICMP datagram noting me that I have to lower the size of the packets.

javi@kubuntu:~$ sudo tcpdump -ni lo icmp -s0
tcpdump: verbose output suppressed, use -v or -vv for full protocol decode listening on lo, link-type EN10MB (Ethernet), capture size 65535 bytes
18:59:33.014773 IP 192.168.1.100 > 192.168.1.100: ICMP 192.168.1.1 unreachable
- need to frag (mtu 1500), length 556


Dec 13, 2010

Linux load average

I wanted to write an article about a topic that over time, it is still generating much confusion: the load average.

The system load average is a set of three numerical values which are provided by tools such as uptime or top. These values represent the average number of system processes that during the last 1, 5 and 15 minutes have been waiting for any resource of the system (CPU, disk access, network, etc.)

[root@centos ~]# uptime
15:43:45 up 9 days,  5:19,  1 user,  load average: 1.62, 1.49, 1.39

[root@centos ~]# top
top - 15:44:32 up 9 days,  5:20,  1 user,  load average: 1.38, 1.43, 1.37
...

In the previous output of the uptime command, 1.49 means that during the last 5 minutes, an average of 1.49 processes have been blocked waiting for some resource allocation.

For instance, I usually set a trigger in Zabbix for when the average load during the last 5 minutes has been higher than the number of cores available on the monitored machine.

When an alarm of this type is raised, does not necessarily have to mean that the CPU is overloaded. At that moment we have to use other Linux tools, such as top, vmstat, iostat, vnstat, etc, in order to find out what process or processes are involved and what resources are affected.

Finally, to emphasize the word of the title (Linux...), since these values for UNIX systems represent the number of processes which have utilized (running) the CPU or have been expecting for it (runnable).


Dec 7, 2010

KVM virtualization on Ubuntu (IV)

This is the last article about KVM virtualization on Ubuntu (I, II, III).

In the first post, I choose as hypervisor localhost (QEMU). If you pick out the other hypervisor available (localhost (QEMU Usermode)) and try to set up a virtual machine, in the last step you will get an error with the following text: "Imposible completar la instalación: «internal error Process exited while reading console log output: char device redirected to /dev/pts/1 qemu: could not open disk image /var/lib/libvirt/images/Ubuntu.img: No such file or directory".


The problem is when you select this hypervisor, the virtual machine is created with your user account, and if you take a look at the permissions on the /var/lib/lubvirt/images directory, you will see that only the root user can write in it.

javi@javi-kubuntu:~$ ls -l /var/lib/libvirt/
total 12
drwxr-xr-x 2 root         root 4096 2010-09-25 00:52 boot
drwxr-xr-x 2 root         root 4096 2010-09-25 00:52 images
drwxr-xr-x 4 libvirt-qemu kvm  4096 2010-12-07 12:28 qemu

The solution consists in changing the directory from root to libvirtd group and adding write permissions.

javi@javi-kubuntu:~$ sudo chown :libvirtd /var/lib/libvirt/images

javi@javi-kubuntu:~$ sudo chmod g+w /var/lib/libvirt/images

Remember that with this sort of connection (localhost (QEMU Usermode)), the storage will be into the /var/lib/libvirt/images directory, but the configuration and log files will reside in the user home.

javi@javi-kubuntu:~$ tree .libvirt/
.libvirt/
├── qemu
│   ├── cache
│   ├── lib
│   ├── log
│   │   └── Ubuntu.log
│   ├── run
│   ├── save
│   ├── snapshot
│   └── Ubuntu.xml
└── storage
├── autostart
│   └── default.xml -> /home/javi/.libvirt/storage/default.xml
└── default.xml

During four articles, we have learnt how to make virtual machines with KVM, libvirt and Virtual Machine Manager. I still have to present several articles related to snapshots, access to hypervisors running on remote machines, types of virtual networks, etc.

KVM is a great option to handle virtual machines. It would be a good idea to carry out some tests in order to meter the performance of different types of hypervisors, such as Xen or VMware.


Nov 29, 2010

Invalid or incomplete multibyte or wide character

The other day I downloaded a video with JDownloader and when I tried to move it into my usb memory, the system did not recognize the file and it could not move it.

The error message which Linux returned was "Caracter multibyte amplio inválido ó incompleto" (I have configured my system in Spanish), "Invalid or incomplete multibyte or wide character" in English.

javi@javi-kubuntu:~$ mv .jdownloader/downloads/TICs_espa�olas.avi /media/disk-2/
mv: no se puede efectuar «stat» sobre «/media/disk-2/TICs_espa\244olas.avi»: Caracter multibyte amplio inválido ó incompleto

This is a serious problem, because in addition to not be able to copy or move the file, you can neither remove it.

The issue is that file is encoded with ISO-8859-15, and my system is configured as UTF-8. The solution consists in converting the file name encoding to UTF-8. In order to carry out this operation, we can use the convmv utility.

javi@javi-kubuntu:~$ sudo aptitude install convmv

javi@javi-kubuntu:~/.jdownloader/downloads$ convmv -f iso-8859-15 -t utf-8 TICs_espa�olas.avi
Your Perl version has fleas #37757 #49830                                                                                                                                                                                                                                
Starting a dry run without changes...                                                                                                                                                                                                                                    
mv "./TICs_espa�olas.avi"    "./TICs_espa€olas.avi"                                                                
No changes to your files done. Use --notest to finally rename the files.

The previous output shows us the final file name after the conversion. So as to apply the changes permanently, you have to add the --notest argument.

javi@javi-kubuntu:~/.jdownloader/downloads$ convmv --notest -f iso-8859-15 -t utf-8 TICs_espa�olas.avi
Your Perl version has fleas #37757 #49830                                                                                                                                                                                                                                  
mv "./TICs_�olas.avi"    "./TICs_€olas.avi"                                                                
Ready!