Feb 27, 2011

Following up network connections with conntrack (II)

Let's finish the previous article about Following up network connections with conntrack (I). Other important parameters which can be changed to optimize the system are related to the time of the different types of connections.

root@ubuntu-server:~# cat /proc/sys/net/ipv4/netfilter/ip_conntrack_tcp_timeout_established
432000

root@ubuntu-server:~# cat /proc/sys/net/ipv4/netfilter/ip_conntrack_tcp_timeout_time_wait
120

root@ubuntu-server:~# cat /proc/sys/net/ipv4/netfilter/ip_conntrack_tcp_timeout_close_wait
60

The first parameter sets up the maximum lifetime for an already established connection (432000 sg can be long; 28800 could be enough). The second and third are the maximum lifetime for a waiting connection and for the remote endpoint closes the socket.

So as to list all variables based on the conntrack module, type the next order.

root@ubuntu-server:~# sysctl -a | grep conntrack | grep ipv4
net.ipv4.netfilter.ip_conntrack_generic_timeout = 600
net.ipv4.netfilter.ip_conntrack_tcp_timeout_syn_sent = 120
net.ipv4.netfilter.ip_conntrack_tcp_timeout_syn_sent2 = 120
net.ipv4.netfilter.ip_conntrack_tcp_timeout_syn_recv = 60
net.ipv4.netfilter.ip_conntrack_tcp_timeout_established = 432000
net.ipv4.netfilter.ip_conntrack_tcp_timeout_fin_wait = 120
net.ipv4.netfilter.ip_conntrack_tcp_timeout_close_wait = 60
net.ipv4.netfilter.ip_conntrack_tcp_timeout_last_ack = 30
net.ipv4.netfilter.ip_conntrack_tcp_timeout_time_wait = 120
net.ipv4.netfilter.ip_conntrack_tcp_timeout_close = 10
net.ipv4.netfilter.ip_conntrack_tcp_timeout_max_retrans = 300
net.ipv4.netfilter.ip_conntrack_tcp_loose = 1
net.ipv4.netfilter.ip_conntrack_tcp_be_liberal = 0
net.ipv4.netfilter.ip_conntrack_tcp_max_retrans = 3
net.ipv4.netfilter.ip_conntrack_udp_timeout = 30
net.ipv4.netfilter.ip_conntrack_udp_timeout_stream = 180
net.ipv4.netfilter.ip_conntrack_icmp_timeout = 30
net.ipv4.netfilter.ip_conntrack_max = 15768
net.ipv4.netfilter.ip_conntrack_count = 2
net.ipv4.netfilter.ip_conntrack_buckets = 4096
net.ipv4.netfilter.ip_conntrack_checksum = 1
net.ipv4.netfilter.ip_conntrack_log_invalid = 0

And if you want to change the value of any variable, you must add it within the sysctl.conf file and reload the settings.

root@ubuntu-server:~# cat /etc/sysctl.conf
...
net.ipv4.netfilter.ip_conntrack_max = 131072

root@ubuntu-server:~# sysctl -p

One interesting option for the conntrack command is the possibility to get the statistics about the connection tracking.

root@ubuntu-server:~# conntrack -S
entries                 2  
searched                0  
found                   1107
new                     4  
invalid                 0  
ignore                  0  
delete                  2  
delete_list             2  
insert                  4  
insert_failed           0  
drop                    0  
early_drop              0  
icmp_error              0  
expect_new              0  
expect_create           0  
expect_delete           0  
search_restart          0

Another useful feature for conntrack is to output the connection state on real-time, similar to when you run a "tail -f" on a file.

root@ubuntu-server:~# conntrack -E

We can conclude with this couple of articles that the conntrack module is other helpful way to improve the Linux performance.


Feb 19, 2011

Cached memory in Linux

I am sure that there are many people that if they saw the following output of 'top', they would say that I have a problem with my free memory... they would be wrong.

[root@zabbix ~]# top
...
Mem:   4044540k total,  4007540k used,    37000k free,   156336k buffers
Swap:  2097144k total,        0k used,  2097144k free,  2086808k cached
...

The previous data correspond to a Zabbix installation where the free memory is around 37 MB, but the cached memory is more than 2 GB. What is happening here?

The answer is straightforward: Linux always tries to use all available memory, and thereby, it caches all read data. If at any moment an application needs memory, Linux will free it from the cached memory. This way of acting is pretty good because you will have better performance having the more frecuent data into the memory.

Really you will have a serious problem when your free memory is low, further your cached memory too and on top of all that, your system begins to swap.

Also say that other excellent data from the above 'top' is the swap memory value: 0. A well configured Linux system never should utilize swap. The key parameter for this purpose is swappiness. I usually set it with a value of 20.

[root@zabbix ~]# cat /proc/sys/vm/swappiness
20

There is a quick manner to force to the operating system so as to free the cached memory: changing the value of the drop_caches variable.

[root@zabbix ~]# cat  /proc/sys/vm/drop_caches
0

[root@zabbix ~]# sync ; echo 1 > /proc/sys/vm/drop_caches

[root@zabbix ~]# top
...
Mem:   4044540k total,  1756996k used,  2287544k free,     1572k buffers
Swap:  2097144k total,        0k used,  2097144k free,    62564k cached
...

We can demonstrate the cached memory operation through an easy bash script. The program will search twice the word "test" inside all files of the /var/log/httpd directory.

[root@zabbix ~]# cat script.sh
#!/bin/bash

for (( i=0; i<2; i++))
do
   free -o -m
   /usr/bin/time -f "\nSeek time: %e sg\n" grep -r test /var/log/httpd/ > /dev/null
done

[root@zabbix ~]# ./script.sh
             total       used       free     shared    buffers     cached
Mem:          3949       1712       2237          0          2        101
Swap:         2047          0       2047

Seek time: 3.76 sg

             total       used       free     shared    buffers     cached
Mem:          3949       2003       1946          0          3        412
Swap:         2047          0       2047

Seek time: 0.50 s

In the first loop you can see that the cached memory was 101 MB and it spent 3.76 sg looping through all files. But in the second loop, the 'grep' command spent 0.5 sg because the files were already cached on memory (its size grew from 101 MB to 412 MB).

If we take a look at the size of the /var/log/httpd directory, we can appreciate that the cached memory increment practically matchs with the size of that directory.

[root@zabbix ~]# du -shx /var/log/httpd/
318M     /var/log/httpd/


Feb 13, 2011

Following up network connections with conntrack (I)

Linux has got the ability to perform a monitoring of existing connections by means of the conntrack module, which is compiled but not installed in distributions such as RHEL or CentOS. In order to load it, you can run the next order.

[root@centos ~]# modprobe ip_conntrack

In other operating systems like Debian or Ubuntu Server, first of all you must install the conntrack package and load the nf_conntrack_ipv4 module (if you want to work with IPv6, you will have to load the nf_conntrack_ipv6 module).

root@ubuntu-server:~# aptitude install conntrack

root@ubuntu-server:~# modprobe nf_conntrack_ipv4

The conntrack module allows the kernel to register in a table all network connections of the system (established, time_wait, close, etc.). It used by several applications such as iptstate (it shows information about the state of the system connections) or Shorewall (firewall).

Another example of use for this module it is for instance, when the server has to realize NAT tasks with iptables and it is necessary to keep a table of connections implicated.

The file where conntrack logs all connections is /proc/net/ip_conntrack.

root@ubuntu-server:~# cat /proc/net/ip_conntrack
tcp      6 89 TIME_WAIT src=192.168.1.11 dst=192.168.1.12 sport=59302 dport=10050 packets=5 bytes=291 src=192.168.1.12 dst=192.168.1.11 sport=10050 dport=59302 packets=5 bytes=289 [ASSURED] mark=0 secmark=0 use=1
...

root@ubuntu-server:~# conntrack -L
tcp      6 89 TIME_WAIT src=192.168.1.11 dst=192.168.1.12 sport=59302 dport=10050 packets=5 bytes=291 src=192.168.1.12 dst=192.168.1.11 sport=10050 dport=59302 packets=5 bytes=289 [ASSURED] mark=0 secmark=0 use=1
...

The two first fields are the connection protocol (TCP, 6) and then is the connection state (TIME_WAIT). The rest of the fields represent the IP addresses and ports involved, as well as the number of packets and bytes exchanged between the two points of the connection.

You have also to take into account that Linux saves the connection state in memory, and each of them uses around 350 bytes.

If you want to know how many open connections has got the system, you can utilize the following sentences.

root@ubuntu-server:~# cat /proc/net/ip_conntrack | wc -l
856

root@ubuntu-server:~# cat /proc/sys/net/ipv4/netfilter/ip_conntrack_count
856

root@ubuntu-server:~# conntrack -C
856

This value is quite important because if at any moment we appreciate that any of our services works slowly (for instance Apache) or many connections are rejected, it can be due to which the number of open connections exceeds the maximum number of connections allowed.

root@ubuntu-server:~# cat /proc/sys/net/ipv4/netfilter/ip_conntrack_max
65536

The size of the hash table is also limited.

root@ubuntu-server:~# cat /proc/sys/net/ipv4/netfilter/ip_conntrack_buckets
16384

If you want to modify it, you must do it when the module is loaded.

root@ubuntu-server:~# modprobe nf_conntrack_ipv4 hashsize=32768


Feb 6, 2011

Fitting virtual disks after reducing

This is the continuation of the article Shrinking virtual disks with LVM. It turns out that once you have mirrored your virtual disk to another smaller, it is normal to have wasted some space in the process, that is to say, an area of the new virtual disk which has been unused.


For this reason, we are going to learn in this article how to recover it. At this moment, the available size of our new disk is 16 GB.

[root@centos ~]# lvs
LV       VG         Attr   LSize  Origin Snap%  Move Log Copy%  Convert
LogVol00 VolGroup00 -wi-ao 16,00G                            
LogVol01 VolGroup00 -wi-ao  1,00G

The idea is to create a new partition on the disk in order to take that unutilized space. The partition type must be Linux LVM (8e hexadecimal code).

[root@centos ~]# fdisk /dev/sda
...
Orden (m para obtener ayuda): n
Acción de la orden
e   Partición extendida
p   Partición primaria (1-4)
p
Número de partición (1-4): 3
Primer cilindro (2241-2480, valor predeterminado 2241):
Se está utilizando el valor predeterminado 2241
Último cilindro o +tamaño o +tamañoM o +tamañoK (2241-2480, valor predeterminado 2480):
Se está utilizando el valor predeterminado 2480

Orden (m para obtener ayuda): t
Número de partición (1-4): 3
Código hexadecimal (escriba L para ver los códigos): 8e
Se ha cambiado el tipo de sistema de la partición 3 por 8e (Linux LVM)

Orden (m para obtener ayuda): w

[root@centos ~]# partprobe

[root@centos ~]# fdisk -l

Disco /dev/sda: 20.4 GB, 20401094656 bytes
255 heads, 63 sectors/track, 2480 cylinders
Unidades = cilindros de 16065 * 512 = 8225280 bytes

Disposit. Inicio    Comienzo      Fin      Bloques  Id  Sistema
/dev/sda1   *           1          13      104391   83  Linux
/dev/sda2              14        2241    17891328+  8e  Linux LVM
/dev/sda3            2241        2480     1924849   8e  Linux LVM

Next step is to set up a PV (physical volume) on that new partition.

[root@centos ~]# pvcreate /dev/sda3

Now we have to add the new PV created to the existing VG (volume group) and then, extend the LV (logical volume).

[root@centos ~]# vgextend VolGroup00 /dev/sda3

[root@centos ~]# lvextend -l +100%FREE /dev/VolGroup00/LogVol00

And finally, we must only to expand the ext3 filesystem.

[root@centos ~]# resize2fs /dev/VolGroup00/LogVol00

After the operation, we have retrieved 1,81 GB.

[root@centos ~]# lvs
LV       VG         Attr   LSize  Origin Snap%  Move Log Copy%  Convert
LogVol00 VolGroup00 -wi-ao 17,81G                             
LogVol01 VolGroup00 -wi-ao  1,00G

So as to realize the task, it is not necessary to put the machine into rescue mode and it can be performed on hot.


Jan 30, 2011

Remote management on KVM with SSH

When we set up virtual machines with libvirt/KVM on production environments, it is typical that the operating system where we want to create the virtual machines, it does not have a graphical user interface as Gnome or KDE, where we can run the Virtual Machine Manager in order to make or handle them.

For this reason, it is necessary to connect it remotely through Virtual Machine Manager so as to set up new virtual machines where a graphical wizard is required.

In this article, we are going to establish a connection over SSH from a Kubuntu 10.10 to a KVM hypervisor located on an Ubuntu Server 10.10. In this way, the libvirt management connection will be securely tunneled over an SSH connection.

In the following figure, you can see the needed packages which must be installed on each computer. Remember that I already presented a series of articles related to KVM virtualization (I, II, III and IV).


First of all, we must start the libvirtd daemon on the Ubuntu Server. We will also ensure that in successive starts, the daemon will run automatically.

javi@ubuntu-server:~$ sudo service libvirt-bin start

javi@ubuntu-server:~$ sudo update-rc.d libvirt-bin defaults

Then, we must generate a public key pair on the computer (kubuntu) where the Virtual Machine Manager (virt-manager package) will be used. In the next step, we have to copy the keys to the machine (ubuntu-server) where libvirtd will be running.

javi@kubuntu:~$ ssh-keygen -t rsa

javi@kubuntu:~$ ssh-copy-id -i ~/.ssh/id_rsa.pub javi@ubuntu-server

In the previous output, we have copied the keys to the javi user home, where 'javi' is a simple user (no root) of ubuntu-server with rights to manage libvirt (by default, any user belonging to libvirtd group can handle libvirt).

And finally, we only have to to make a remote connection over SSH from the Virtual Machine Manager to the hypervisor located on the Ubuntu Server.


Jan 23, 2011

Shrinking virtual disks with LVM

It is possible that what I am going to tell next can be done in other ways, but I am really sure that it will be very useful for many people. Have you ever thought how to reduce a virtual disk on VMware, KVM, Xen, etc. with a Linux filesystem created inside?

If the virtual disk just contains a filesystem such as ext3, ext4, btrfs, etc., the solution is easy: use any partition tool like GParted, shrink the partition or partitions and copy them to another virtual disk smaller.

But what happens if that virtual disk has a filesystem over a Logical Volume (LV)? The solution is not trivial, since partion tools do not support Logical Volume Management (LVM).

Then I am going to explain my solution. For my tests, I will use a CentOS 5.5 virtual machine under VMware vSphere, with a virtual disk of 64 GB (sda). That virtual disk will have two partitions: sda1 (107 MB) and sda2 (63,88 GB).

[root@centos ~]# fdisk -l

Disco /dev/sda: 68.7 GB, 68719476736 bytes
255 heads, 63 sectors/track, 8354 cylinders
Unidades = cilindros de 16065 * 512 = 8225280 bytes

Disposit. Inicio    Comienzo      Fin      Bloques  Id  Sistema
/dev/sda1   *           1          13      104391   83  Linux
/dev/sda2              14        8354    66999082+  8e  Linux LVM

The second partition (sda2) will have two LVs, LogVol00 (data area) and LogVol01 (swap).

[root@centos ~]# lvs
LV       VG         Attr   LSize  Origin Snap%  Move Log Copy%  Convert
LogVol00 VolGroup00 -wi-ao 62,88G              
LogVol01 VolGroup00 -wi-ao  1,00G

My goal will be to decrease the size of the virtual disk from 64 GB to 19 GB.


In order to be able to resize the ext3 filesystem, LV, VG (Volume Group), PV (Physical Volume) and sda2 partition, you must boot the computer in rescue mode (using for example a Live CD).

boot: linux rescue

During the boot process, we will not mount the existing Linux installation and skip directly to the command shell. Then, we have to activate all known volume groups in the system and check the filesystem to rule out possible errors on it.

sh-3.2# lvm vgchange -a y

sh-3.2# e2fsck -f /dev/VolGroup00/LogVol00

Afterwards, first we must resize the filesystem from 62,88 GB to 16 GB and then, the LV.

sh-3.2# resize2fs /dev/VolGroup00/LogVol00 16G

sh-3.2# lvm lvresize --size 16G /dev/VolGroup00/LogVol00

Because we have reduced the LogVol00 size, now there is a gap between both volumes and it is better that we remove LogVol01 and recreate it again.

sh-3.2# lvm lvremove /dev/VolGroup00/LogVol01

sh-3.2# lvm lvcreate --size 1G --name LogVol01 VolGroup00

sh-3.2# mkswap /dev/VolGroup00/LogVol01

Next step is to decrease the size of the PV. We need 16 GB for the data area and 1 GB for the swap.

sh-3.2# lvm pvresize /dev/sda2 --setphysicalvolumesize 17G
/dev/sda2: cannot resize to 511 extens as 544 are allocated.
0 physical volume(s) resized / 1 physical volume(s) not resized

We can see that we must fit correctly that space... it is easy, a simple rule of three (17*544/511).

sh-3.2# lvm pvresize /dev/sda2 --setphysicalvolumesize 17.03G
Physical volume "/dev/sda2" changed
1 physical volume(s) resized / 0 physical volume(s) not resized

And finally, we have to resize that sda2 partition. To calculate the end sector, first we must take a look at the partition map in sectors (one sector is 512 bytes), get the starting point of the sda2 partition (208845s), add it the size of the PV (35651584s) and also add a security margin of around 64 MB (131072s).

sh-3.2# lvm pvs --units s
PV         VG         Fmt  Attr PSize     PFree
/dev/sda2  VolGroup00 lvm2 a-   35651584S    0S

sh-3.2# parted /dev/sda unit s print
Disk /dev/sda: 134217727s
Sector size (logical/physical): 512B/512B
Partition Table: msdos

Number  Start    End         Size        Type     File system  Flags
1      63s      208844s     208782s     primary  ext3         boot
2      208845s  134207009s  133998165s  primary               lvm

Now we can resize the partition: 208845 + 35651584 + 131072 = 35991501.

sh-3.2# parted /dev/sda rm 2

sh-3.2# parted /dev/sda mkpart primary 208845s 35991501s

sh-3.2# parted /dev/sda set 2 lvm on

sh-3.2# parted /dev/sda print
Disk /dev/sda: 68.7GB
Sector size (logical/physical): 512B/512B
Partition Table: msdos

Number  Start   End     Size    Type     File system  Flags
1      32.3kB  107MB   107MB   primary  ext3         boot
2      107MB   18.4GB  18.3GB  primary               lvm

It is necessary check again the filesystem to see that all is right.

sh-3.2# e2fsck -f /dev/VolGroup00/LogVol00

Now we have to add a second virtual disk (19 GB) to the system and copy the data from sda to sdb.

sh-3.2# dd if=/dev/sda of=/dev/sdb bs=1M &

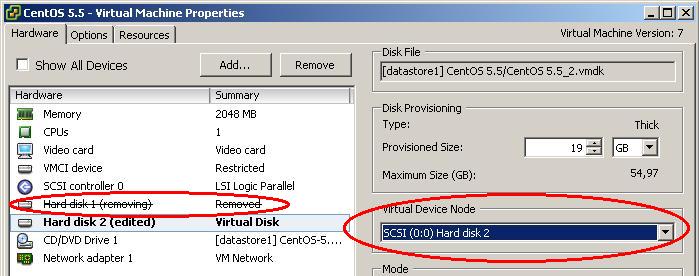
When the task is complete, we must turn off the virtual machine, delete the first virtual disk (64 GB) and put the second (19 GB) as primary for the next boot.


Then we will finish starting the virtual machine.


Jan 17, 2011

Proxmox VE cluster

Other interesting feature related to Proxmox VE is the possibility to join all Proxmox VE installations in an unique cluster which centralizes and manages all virtual machines. Besides, we will also be able to move the virtual instances between Proxmox VE nodes.

In the following tests we are going to set up a cluster using two Proxmox VE 1.7 servers (proxmox1.local, with IP address 192.168.122.211/24 and proxmox2.local, with IP address 192.168.122.212/24). The two Proxmox VE nodes will be two virtual machines running under KVM.

The cluster setting does not support web management, therefore the only way is to utilize the bash console (pveca command).

First of all, we have to define the master node (for instance proxmox1.local).

proxmox1:~# pveca -c
cluster master successfully created

proxmox1:~# pveca -l
CID----IPADDRESS----ROLE-STATE--------UPTIME---LOAD----MEM---DISK
1 : 192.168.122.211 M     A           00:13   0.00    16%    20%

Now we can add new slaves to the master. In our case, we will assign one only node to the cluster, proxmox2.local.

proxmox2:~# pveca -a -h 192.168.122.211
cluster node successfully created

proxmox2:~# pveca -l           
CID----IPADDRESS----ROLE-STATE--------UPTIME---LOAD----MEM---DISK
1 : 192.168.122.211 M     A           00:23   0.00    18%    20%
2 : 192.168.122.212 N     A           00:23   0.00    17%    20%

If we open a web browser for the master node, we will be able to see in the main screen the cluster state.


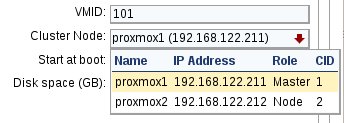
If we want to make a virtual machine, we will be able to choose the server where the virtual machine will be created.


Other useful orders provided by the pveca command are the next:

proxmox2:~# pveca --help
...
pveca -s [-h IP]     # sync cluster configuration from master (or IP)
pveca -d ID          # delete a node
pveca -m             # force local node to become master
pveca -i             # print node info (CID NAME IP ROLE)

And finally, we also have the option of live migration in order to move virtual machines between physical servers. This is an interesting characteristic because in this way, we can locate a virtual machine in other Proxmox node with better hardware, or simply for maintenance tasks.

For example, we are going to imagine that we have a CentOS 5 virtual machine installed on proxmox1.local, and we want to migrate it to proxmox2.local.


For this purpose, we have to open VM Manager, Virtual Machines section and select the Migrate tab. Then, we must select the source and target nodes and the VMID to migrate and press the migrate button (the virtual machine to be moved can be turned on).