Apr 17, 2011

Benchmarking with Phoronix Test Suite (II)

This is the second and final part of the article Benchmarking with Phoronix Test Suite.

If we want to carry out the test or suite with the default options, we must aggregate the default-run parameter. Also mention that we can type multiple tests or suites with the run or default-run order.

root@ubuntu-server:~/phoronix-test-suite# ./phoronix-test-suite run iozone

Phoronix Test Suite v3.0.1
IOzone Test Configuration


Record Size:

1: 4Kb
2: 64Kb
3: 1MB
4: Test All Options

Enter Your Choice: 2

File Size:

1: 512MB
2: 2GB
3: 4GB
4: 8GB
5: Test All Options

Enter Your Choice: 1

Disk Test:

1: Write Performance
2: Read Performance
3: Test All Options

Enter Your Choice: 3
Would you like to save these test results (Y/n): Y
Enter a name to save these results: ubuntu-server

Current Test Identifiers:
- apache

Enter a unique name for this test run: iozone
...

root@ubuntu-server:~/phoronix-test-suite# ./phoronix-test-suite default-run iozone

Where are the results and the test environments stored on the filesystem?

root@ubuntu-server:~# tree -d .phoronix-test-suite/test-results/
.phoronix-test-suite/test-results/
├── pts-results-viewer
└── ubuntu-server
├── result-graphs
└── system-logs
├── apache
└── iozone

root@ubuntu-server:~# tree -d .phoronix-test-suite/installed-tests/
.phoronix-test-suite/installed-tests/
└── pts
├── apache-1.3.0
└── iozone-1.7.0

So as to get information about the saved test results and the installed tests and their usage, we have the next options.

root@ubuntu-server:~/phoronix-test-suite# ./phoronix-test-suite list-saved-results
                                                                                                                                                                                                                                                             
Phoronix Test Suite v3.0.1                                                                                                                                                                                                                                            
1 Saved Results                                                                                                                                                                                                                                                       
                                                                                                                                                                                                                                                             
Saved Name: ubuntu-server      Title: ubuntu-server                                                                                                                                                                                                                   
- apache                                                                                                                                                                                                                                                      
- iozone

root@ubuntu-server:~/phoronix-test-suite# ./phoronix-test-suite list-test-usage

Phoronix Test Suite v3.0.1
2 Tests Installed

TEST                 VERSION  INSTALL DATE  LAST RUN    AVG RUN-TIME  TIMES RUN
pts/apache-1.3.0   - 1.3.0    2011-04-01    2011-04-01  5m15s         1
pts/iozone-1.7.0   - 1.7.0    2011-04-02    2011-04-02  2m10s         2

And further, if we want to acquire more details about an executed result, the info parameter will be our choice.

root@ubuntu-server:~/phoronix-test-suite# ./phoronix-test-suite info ubuntu-server

Title: ubuntu-server
Identifier: ubuntu-server

Test Result Identifiers:
- apache
- iozone

Contained Tests:
- Apache Benchmark
- IOzone

Finally, we also have the option to export the results in other formats (csv, text and pdf).

root@ubuntu-server:~/phoronix-test-suite# ./phoronix-test-suite result-file-to-text ubuntu-server > ubuntu-server.txt

root@ubuntu-server:~/phoronix-test-suite# ./phoronix-test-suite result-file-to-csv ubuntu-server > ubuntu-server.csv

root@ubuntu-server:~/phoronix-test-suite# ./phoronix-test-suite result-file-to-pdf ubuntu-server

Saved To: /root/ubuntu-server.pdf

As well, we will always have the possibility to treat directly the results by means of the html structure.

root@ubuntu-server:~# ls -l .phoronix-test-suite/test-results/ubuntu-server/
total 32
-rw-r--r-- 1 root root 3291 2011-04-02 18:00 composite.xml
-rw-r--r-- 1 root root  192 2011-04-02 18:00 index.html
-rw-r--r-- 1 root root 5163 2011-04-02 21:32 pts-results-viewer.xsl
drwxr-xr-x 2 root root 4096 2011-04-02 21:32 result-graphs
drwxr-xr-x 4 root root 4096 2011-04-02 18:00 system-logs
-rw-r--r-- 1 root root 1491 2011-04-02 17:51 test-1.xml
-rw-r--r-- 1 root root 2210 2011-04-02 18:00 test-2.xml

With html or pdf formats, apart from the numeric data, we will be able to appreciate that Phoronix generates several graphics through the results.

Also point out another useful utility: we can merge several results and obtain a new combination from all of them. For this purpose, we first have to copy the other outcomes into the test-results directory.

root@ubuntu-server:~/phoronix-test-suite# ./phoronix-test-suite merge-results ubuntu-server centos
Merged Results Saved To: /root/.phoronix-test-suite/test-results/merge-8136/composite.xml

The key of this benchmarking application is to apply correctly in each moment the suitable tests. Due to the large variety of available tests, we can get much information. On the contrary, the main problem under my personal opinion is that the options which you can choose to run a test are very limited. If you wanted to gather more information from a specific tool (for instance iozone), you should execute it manually.

But in short, I think that Phoronix Test Suite is a great tool for measuring the perfomance of a system.

Apr 11, 2011

Automatic updates on Ubuntu with unattended-upgrades

Some time ago I talked about the importance of having correctly our Linux systems up to date (at least automatically), specifically those issues related to security, focusing on CentOS/RHEL distributions. For this purpose I wrote an article named yum-security plugin.

For systems based on Debian/Ubuntu, you have got a package denominated unattended-upgrades, which allows to apply automatic updates (stable, security, updates and proposed-updates).

When we install an Ubuntu release, on the one hand we can mark the option for the system to automatically install the security updates. In this case, Ubuntu will install the unattended-upgrades package on the server and manage this subject.

And on the other, we can directly install it later and fit it based on our needs.

root@ubuntu-server:~# aptitude install unattended-upgrades

Through its configuration file (50unattended-upgrades), we can fit the types of updates (stable and security), the list of packages which must not be updated (mysql-server and apache2), an optional email address for warning about any problem, band with and so on.

root@ubuntu-server:~# cat /etc/apt/apt.conf.d/50unattended-upgrades
// Automatically upgrade packages from these (origin, archive) pairs
Unattended-Upgrade::Allowed-Origins {
  "${distro_id} stable";
  "${distro_id} ${distro_codename}-security";
//      "${distro_id} ${distro_codename}-updates";
//      "${distro_id} ${distro_codename}-proposed-updates";
};

// List of packages to not update
Unattended-Upgrade::Package-Blacklist {
  "mysql-server";
  "apache2";
};

// Send email to this address for problems or packages upgrades
Unattended-Upgrade::Mail "admin@ubuntu-server.local";

// Do automatic removal of new unused dependencies after the upgrade
//Unattended-Upgrade::Remove-Unused-Dependencies "false";

// Automatically reboot *WITHOUT CONFIRMATION* if a
// the file /var/run/reboot-required is found after the upgrade
Unattended-Upgrade::Automatic-Reboot "false";

// Use apt bandwidth limit feature, this example limits the download
// speed to 70kb/sec
//Acquire::http::Dl-Limit "70";

In order to set the update period (in days), we have to edit the 20auto-upgrades file. In the following example, the packages which can be updated will be downloaded everyday, but the automatic updates will just be applied once a week. The downloaded packages will be removed every 15 days.

root@ubuntu-server:~# cp -a /usr/share/unattended-upgrades/20auto-upgrades /etc/apt/apt.conf.d/

root@ubuntu-server:~# cat /etc/apt/apt.conf.d/20auto-upgrades
APT::Periodic::Update-Package-Lists "1";
APT::Periodic::Download-Upgradeable-Packages "1";
APT::Periodic::Unattended-Upgrade "7";
APT::Periodic::AutocleanInterval "15";

We can manually execute the unattended-upgrade daemon as well, by means of the next order.

root@ubuntu-server:~# unattended-upgrade -d
Initial blacklisted packages: mysql-server apache2
Starting unattended upgrades script
Allowed origins are: ["('Ubuntu', 'stable')", "('Ubuntu', 'maverick-security')"]
pkgs that look like they should be upgraded:
Fetched 0B in 0s (0B/s)                                                                                                                                                           
blacklist: ['mysql-server', 'apache2']
InstCount=0 DelCount=0 BrokenCout=0
No packages found that can be upgraded unattended

And finally, also say this application will be run via cron (/etc/cron.daily/apt). All output will be logged into the /var/log/unattended-ugprades.log file.


Apr 5, 2011

Benchmarking with Phoronix Test Suite (I)

The Phoronix Test Suite is an interesting benchmarking platform aimed at testing and measuring the performance of multiple stuff, such as computers, graphics cards, processors, operating systems and so on.

I have used (in my professional work) and talked about this tool several times, but I had never dedicated any article to evaluate it. Let's get going!

For my tests, I am going to utilize an Ubuntu Server 10.10 (64 bits) and Phoronix Test Suite 3.0.1. When you download the application and descompress it, you have two options: on the one hand you can install it over the operating system (install.sh), and on the other, you may directly run the appropiate script (phoronix-test-suite) and carry out all the options that Phoronix provides. Regardless the choice, first of all you must install a serie of necessary dependences.

root@ubuntu-server:~# aptitude install php5-cli php5-gd php5-curl php-fpdf

root@ubuntu-server:~# tar xvzf phoronix-test-suite-3.0.1.tar.gz

root@ubuntu-server:~/phoronix-test-suite# ./install-sh

In my case, I will choose the second. Also say that if we are behind a proxy, we have to execute the script with the network-setup option, in order to set the proxy configuration up. In addition, we can check out the information about our system hardware and software.

root@ubuntu-server:~/phoronix-test-suite# ./phoronix-test-suite network-setup

root@ubuntu-server:~/phoronix-test-suite# ./phoronix-test-suite system-info

Phoronix Test Suite v3.0.1
System Information

Hardware:
Processor: QEMU Virtual 0.12.5 @ 3.00GHz (1 Core), Motherboard: Bochs, Chipset: Red Hat Virtio, Memory: 1 x 2048 MB RAM, Disk: 15GB, Graphics: Cirrus Logic GD 5446

Software:
OS: Ubuntu 10.10, Kernel: 2.6.35-28-server (x86_64), Display Driver: cirrus, File-System: ext4

Phoronix supplies a set of suites (cpu, database, kernel, memory, etc.) that in turn, make up a group of tests (compress-gzip, dbench, sqlite, etc.), also known as profiles. In total, we have around more than 60 suites and 130 tests.

root@ubuntu-server:~/phoronix-test-suite# ./phoronix-test-suite list-available-suites

Phoronix Test Suite v3.0.1
Available Suites

pts/audio-encoding               - Audio Encoding                   System
pts/chess                        - Chess Test Suite                 Processor
pts/compilation                  - Timed Code Compilation           Processor
...

root@ubuntu-server:~/phoronix-test-suite# ./phoronix-test-suite list-available-tests

Phoronix Test Suite v3.0.1
Available Tests

pts/aio-stress               - AIO-Stress                          Disk
pts/apache                   - Apache Benchmark                    System
pts/battery-power-usage      - Battery Power Usage                 System
...

If we want to know more details about a concrete suite or test, we can run the following order (in this example, the memory suite consists of three tests).

root@ubuntu-server:~/phoronix-test-suite# ./phoronix-test-suite info memory

Phoronix Test Suite v3.0.1
Memory Test Suite

Run Identifier: pts/memory-1.0.2
Suite Version: 1.0.2
Maintainer: Michael Larabel
Suite Type: Memory
Unique Tests: 3
Suite Description: The system memory test suite consists of tests designed to test the computer's system memory (RAM) performance. Among these tests are RAMspeed and Bandwidth.

pts/memory-1.0.2
* pts/ramspeed
* pts/stream
* pts/cachebench

And if we want to install a suite or test, we must add the install parameter to the script. This sentence will firstly resolve and install the necessary dependences and afterwards, download, compile and install the test. If you select a suite, this order will install all tests belonging to the suite.

root@ubuntu-server:~/phoronix-test-suite# ./phoronix-test-suite install apache

The following dependencies are needed and will be installed:

- build-essential
...
Phoronix Test Suite v3.0.1

To Install: pts/apache-1.3.0
...

Then we are going to see the execution of the apache test (we can also use this command to launch a suite).

root@ubuntu-server:~/phoronix-test-suite# ./phoronix-test-suite run apache
Would you like to save these test results (Y/n): Y
Enter a name to save these results: ubuntu-server
Enter a unique name for this test run: apache

Phoronix Test Suite v3.0.1
If you wish, enter a new description below.
Press ENTER to proceed without changes.

Current Description: Running pts/apache-1.3.0.

New Description:


Apache Benchmark:
pts/apache-1.3.0
Test 1 of 1
Expected Trial Run Count: 3
Running Pre-Test Script @ 15:45:48
Started Run 1 @ 15:45:53
Started Run 2 @ 15:47:34
Started Run 3 @ 15:49:17  [Std. Dev: 2.00%]
Running Post-Test Script @ 15:51:00

Test Results:
7156.08
7026.62
6876.06

Average: 7019.59 Requests Per Second

In the previous output, we can make out that the script has asked for a name to save the results (under this name, we will be able to save other tests) and a specific name for the test. In other tests as follows, we can see that the script requests other types of data, such as the record size, file size and disk test.

Mar 27, 2011

Booting the system with Upstart (II)

Continuing with the article Booting the system with Upstart (I) and in particular, the part of the events, we can also set many other types of triggers.

root@ubuntu-server:~# cat /etc/init/job1.conf
# Start when the loading modules have concluded
start on stopped load-modules

# Start when the filesystem is mounted
start on filesystem

# Start when the filesystem is mounted and the network is started
start on filesystem and started network

# Start under the runlevels 2, 3 and 5
start on runlevel [235]
...

The initctl utility allows to pass down a concrete event.

root@ubuntu-server:~# initctl emit myevent

If we take a look at the files dropped off within the /etc/init directory, we will be able to find out many other events. For instance, if we open the mountall.conf file, we can see that this job mounts the filesystems during the boot and emits events as local-filesystems, all-swaps, etc.

All the theory described for "start on", also can be applied when we want to stop a job.

root@ubuntu-server:~# cat /etc/init/job1.conf
stop on starting shutdown
...

This command as well can be used to list the status of all jobs handled by Upstart.

root@ubuntu-server:~# initctl list
mountall-net stop/waiting
rc stop/waiting
rsyslog start/running, process 687
...

Another interesting configuration option is the respawn tag, which is utilized to start automatically a job if it stops abnormally. We can also set that if a job is respawned more that X times in Y seconds, it will be stopped definitely.

root@ubuntu-server:~# cat /etc/init/job1.conf
respawn

respawn limit 10 120
...

What happens if we want to perform some previous task to start a job? For this case, Upstart provides the pre-start directive, which is run before the job reaches the starting state.

root@ubuntu-server:~# cat /etc/init/job1.conf
pre-start script
   rm /tmp/job*
end script
...

Instead of a script, we can also execute a binary.

root@ubuntu-server:~# cat /etc/init/job1.conf
pre-start exec /usr/local/sbin/nessusd
...

In addition, we can specify other kinds of pre/post actions.

root@ubuntu-server:~# cat /etc/init/job1.conf
# Before the job is started
post-start exec|script

# Before the job is stopping
pre-stop exec|script

# Before the job is stopped
post-stop exec|script
...

You can get more information as always... by accessing the man.

root@ubuntu-server:~# man 5 init


Mar 20, 2011

Taking snapshots on KVM with libvirt

There is an interesting feature related to the KVM virtualization, the snapshots, which take the disk, memory and device state of a concrete domain at a specific moment. This can have many use cases, such as saving a copy of a virtual machine, preserving a domain's state before a potentially dangerous operation, etc. Snapshots are identified with an unique name and can be taken with the virtual machine turned on.

This feature can only be used with the virsh command and not with the graphical tool (the version of Virtual Machine Manager included on Kubuntu 10.10 is the 0.8.4).

So as to create a snapshot for a particular domain, we must set a XML file with at least a name and description for the snapshot.

javi@javi-kubuntu:~$ cat UbuntuServer_10.10-ss.xml
<domainsnapshot>
   <name>UbuntuServer_10.10-16032011</name>
   <description>Snapshot of OS install and updates</description>
</domainsnapshot>

javi@javi-kubuntu:~$ virsh snapshot-create UbuntuServer_10.10 UbuntuServer_10.10-ss.xml
error: Requested operation is not valid: Disk '/var/lib/libvirt/images/UbuntuServer_10.10.img' does not support snapshotting

It is possible that as in the previous output, we get an error message about the virtual disk does not support snapshotting. What is the problem in this case?

The sort of the disk image is raw (default format when you create a virtual machine), which is very simple and does not allow snapshotting. In contradistinction to raw, qcow2 (QEMU image format) supports to have smaller images, encryption, compression, snapshots and so on.

In order to make a qcow2 virtual disk, we can run the following command. In this case, we have reserved all the space for the virtual disk. If we do not want to preallocate the image with metadata, we must take away the "preallocation" option.

javi@javi-kubuntu:~$ sudo qemu-img create -f qcow2 -o preallocation=metadata /var/lib/libvirt/images/UbuntuServer_10.10.qcow2 8G

javi@javi-kubuntu:~$ sudo chown libvirt-qemu:kvm /var/lib/libvirt/images/UbuntuServer_10.10.qcow2

If we want to convert an existing image (for example raw to qcow2), we can use the next order.

javi@javi-kubuntu:/var/lib/libvirt/images$ sudo qemu-img convert -f raw -O qcow2 -o preallocation=metadata UbuntuServer_10.10.raw UbuntuServer_10.10.qcow2

javi@javi-kubuntu:/var/lib/libvirt/images$ sudo chown libvirt-qemu:kvm UbuntuServer_10.10.qcow2

In this moment, we will be able to set a snapshot up with the virsh snapshot-create command. This operation will generate a new XML file.

javi@javi-kubuntu:~$ ls -l /var/lib/libvirt/qemu/snapshot/UbuntuServer_10.10/UbuntuServer_10.10-16032011.xml
-rw------- 1 root root 307 2011-03-16 11:40 /var/lib/libvirt/qemu/snapshot/UbuntuServer_10.10/UbuntuServer_10.10-16032011.xml

javi@javi-kubuntu:~$ virsh snapshot-dumpxml UbuntuServer_10.10 UbuntuServer_10.10-16032011
<domainsnapshot>
   <name>UbuntuServer_10.10-16032011</name>
   <description>Snapshot of OS install and updates</description>
   <state>shutoff</state>
   <creationTime>1300272022</creationTime>
   <domain>
      <uuid>d19af827-30ca-b3a0-8304-231f8cf5dd8b</uuid>
   </domain>
</domainsnapshot>

So as to list all the available snapshots for a certain domain, we can type the following order.

javi@javi-kubuntu:~$ virsh snapshot-list UbuntuServer_10.10
Name                        Creation time             Status
---------------------------------------------------------------
UbuntuServer_10.10-16032011 2011-03-16 11:40:22 +0100 shutoff

If at any point we want to bring back a snapshot, we must run the next command.

javi@javi-kubuntu:~$ virsh snapshot-revert UbuntuServer_10.10 UbuntuServer_10.10-16032011

And finally, we also have the option to remove a snapshot.

javi@javi-kubuntu:~$ virsh snapshot-delete UbuntuServer_10.10 UbuntuServer_10.10-16032011


Mar 12, 2011

System monitoring with nmon

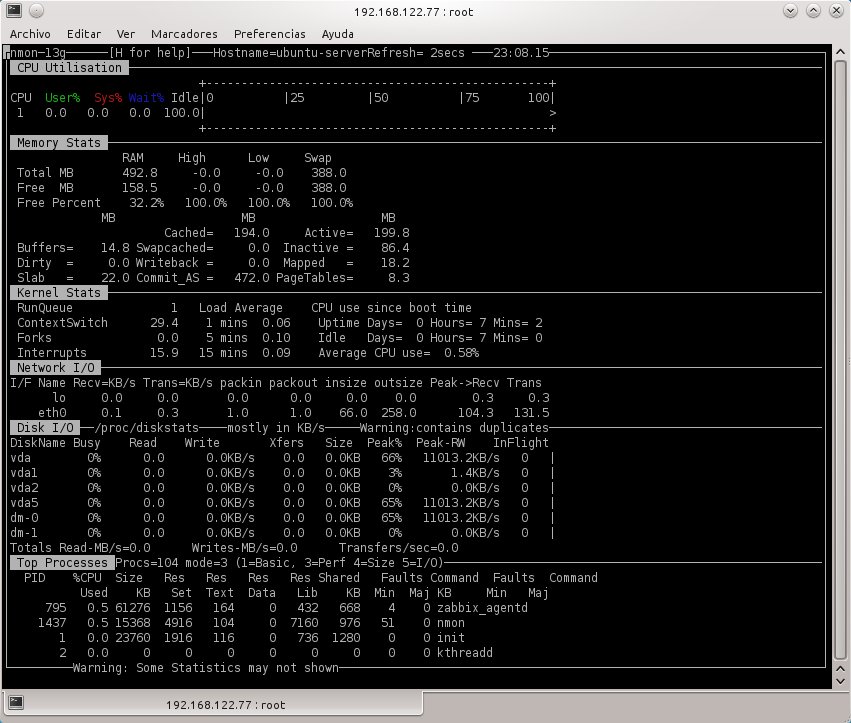
Nmon is another interesting monitoring tool for Linux systems which can present many information related to the CPU, memory, network, etc. through an organized screen.

I have tested the 13g version on Ubuntu Server 10.10. When you start the application, this shows you a little menu with different options, in order to configure your own monitoring panel.

The next figure is a dump of my setting. I have used CPU utilization by processor, memory and swap stats, kernel stats and load average, network and disk input/output and top processes.


And finally, also say that with nmon you can take the data and dump them into a CSV file. For instance, in the following case I have run nmon in background to capture the data each 5 sg and a total of 200 times. Besides I have specified the file name with the '-F' option.

root@ubuntu-server:~# nmon -t -F `hostname`.csv -s 5 -c 200


Mar 5, 2011

Booting the system with Upstart (I)

Upstart is a management daemon which leads the starting and stopping of the system services, and besides, handles them whereas they are running. It is an application actually used on system such as Ubuntu, Fedora, RHEL, etc. and it has replaced the traditional System V init daemon (SysV).

It turns out that SysV has not been really taken away, since while there are tasks based on SysV, both systems will have to live together. Indeed, there is a job defined by Upstart and named rc-sysinit.conf, which controls the execution of the existing traditional SysV scripts. An Upstart system runs by default in runlevel 2.

root@ubuntu-server:~# runlevel
N 2

What is the main advantage of Upstart against SysV under my personal opinion? In contradistinction to SysV, Upstart allows to launch the services or tasks (here named jobs) in parallel, that is to say, they have just to wait for certain events happen. For example, when the Upstart init daemon has finished its initialization (upstart), when the filesystem is mounted (filesystem), MySQL daemon is started (started mysqld), and so on.

Let's see how Upstart works. All Upstart jobs are files made up of a well known structure and stored into the /etc/init directory. For example, we are going to develop an easy job to write the date within a tmp file. Its name will be job1.

root@ubuntu-server:~# cat /etc/init/job1.conf
script
   date > /tmp/job1.tmp ; sleep 10
end script

One of the ways to start this job is manually.

root@ubuntu-server:~# start job1
job1 start/running, process 1705

If we take a look at its state before 10 sg, we will see which is start/running. Afterwards, it will be stop/waiting, since in this case, it is not a daemon such as httpd, but a process which finishes when completes theirs defined tasks.

root@ubuntu-server:~# status job1
job1 start/running, process 1710

root@ubuntu-server:~# status job1
job1 stop/waiting

Upstart allows to define a job or by a script section (as the previous example - remember that the scripting code will be launch under "sh -e") either using the exec directive.

root@ubuntu-server:~# cat /etc/init/job1.conf
script
   exec date > /tmp/job1.tmp
end script

This sort of stanza can be used for instance to run a script or start a daemon like mysqld (zero or more arguments can be passed to it). Other manner to start a job is through an event. For example, we can run our job when job2 or job3 are started.

root@ubuntu-server:~# cat /etc/init/job1.conf
start on started job2 or started job3
...

By default, a job is a service that during its life cycle will be able to pass for different stages: starting, started, stopping and stopped, and in addition, will be able to be respawned if it exits with a zero status.

If we want to specify that the job is a task (it is considered to have finished when it has been run and stopped again - it will terminate with zero status but it will not be able to be respawned), we will have to add the task parameter into the configuration file. Otherwise, Upstart will treat the job as a service.