Jun 7, 2011

Cloud computing with OpenNebula

OpenNebula is an IaaS (Infraestructure as a Service) open source solution which allows to build private, public and hybrid clouds. It has been designed to be able to integrate with any kind of network or storage system and supports the main types of hypervisors: KVM, VMware vSphere (ESXi) and Xen.

Next figure shows a typical schema of an OpenNebula infrastructure, which I am going to develop in future articles.


The server named fronted01 runs OpenNebula and the cluster services. The principal components of OpenNebula are the daemon (manage the life cycle of virtual machines, network, storage and hypervisors), the scheduler (manage the deployment of virtual machines) and the drivers (manage the hypervisor interfaces - VMM -, monitoring - IM - and virtual machines transfers - TM -).

OpenNebula needs too a database to save the information. We have two options: SQLite and MySQL. In my architecture, I will use MySQL and it will be installed on frontend01.

With respect to the storage, OpenNebula works with three possibilities: shared - NFS (there is a shared data area accessible by OpenNebula server and computational nodes), non-shared - SSH (there is no shared area - live migrations cannot be used) and LVM (there must be a block device available in all nodes).

In the articles that I will write about it, I will configure a NFS shared into the storage01 server. It is normal as well to find some architecture where the storage is established inside the front-end. Also point out that the storage is used for keeping the virtual images and machines.

As in any classical IaaS solution, we require the computing nodes (also known as worker nodes), which supply the raw computing power and where the virtual machines are run. In this example, I will employ two hypervisors: KVM (kvm01) and VMware vSphere (esxi01). OpenNebula must be able to start, control and monitor the virtual machines. The communication between OpenNebula and nodes will be carry out through the drivers previously configured.

We can appreciate that OpenNebula is a fully scalable system, since we can add more computational nodes or storage servers based on our needs.

Other features are portability and interoperability, due to we may utilize most of the existing hardware to set up the clusters.

And finally, we face an open and standard architecture model, and besides, it can operate with other public clouds such as Amazon.

Jun 1, 2011

Zabbix server installation on Ubuntu (II)

We are going to conclude the last part of the Zabbix server installation on Ubuntu by setting up a new Apache web site for Zabbix.

root@ubuntu-server:~# cat /etc/apache2/sites-available/zabbix
<VirtualHost *:80>
Alias /zabbix /usr/share/zabbix
ErrorLog /var/log/apache2/zabbix-error.log
CustomLog /var/log/apache2/zabbix-access.log common
</VirtualHost>


root@ubuntu-server:~# a2dissite default

root@ubuntu-server:~# a2ensite zabbix

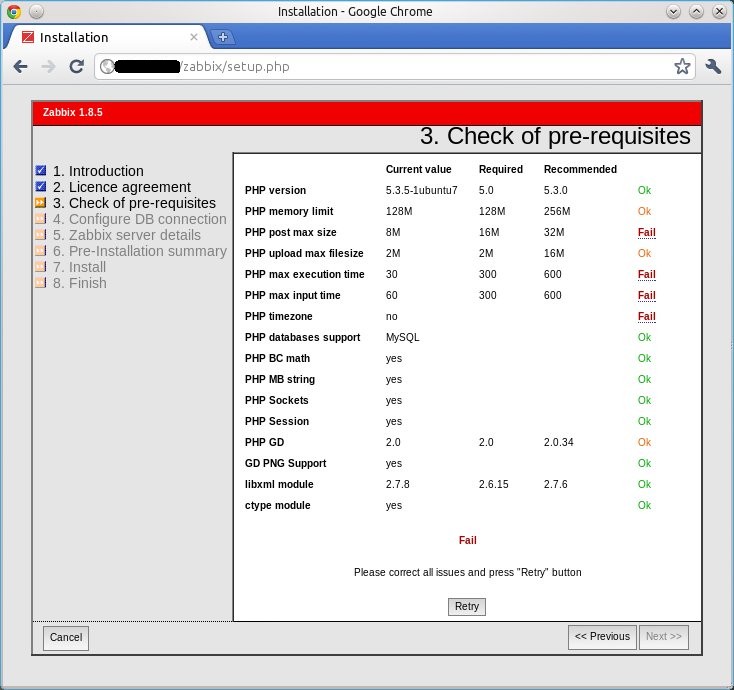
Besides it is also necessary to modify the PHP configuration file for adjusting it with the Zabbix requirements.

root@ubuntu-server:~# cat /etc/php5/apache2/php.ini
...
memory_limit = 256M

post_max_size = 32M

upload_max_filesize = 16M

max_execution_time = 600

max_input_time = 600

date.timezone = Europe/Madrid

Finally, we have to open a web browser, point to the Zabbix URL (http://ubuntu-server/zabbix in my case) and fulfill the wizard. In the first screen, Zabbix checks the pre-requisites and warns us if something is wrong.


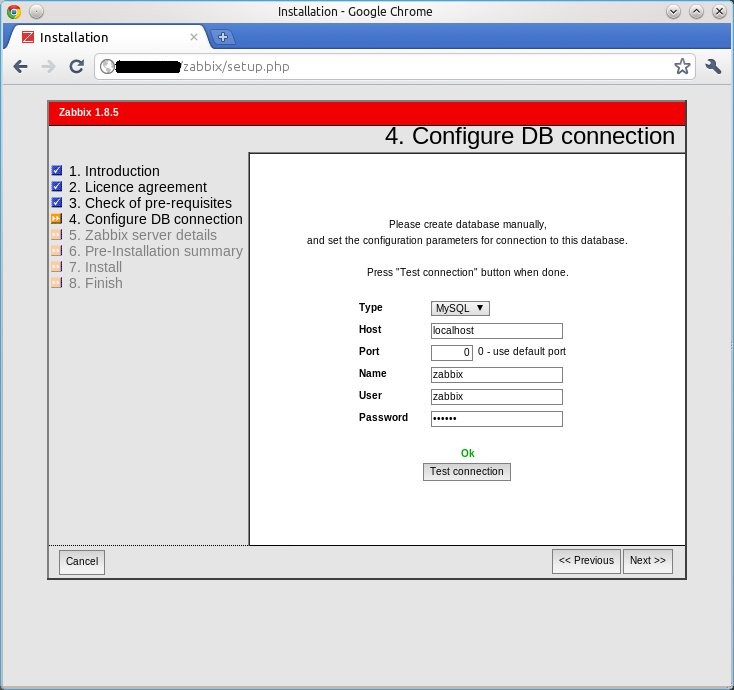
In the fourth step (Configure DB connection), we have to enter the configuration parameters for the database connection.


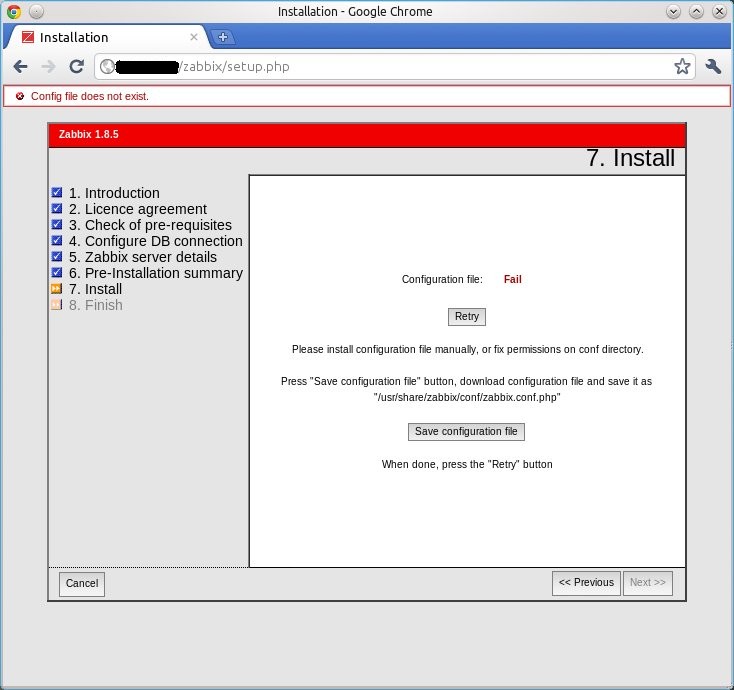
At the end of the wizard, we must download the Zabbix PHP configuration file (zabbix.conf.php) by clicking on the Save configuration file button.


Then we have to copy that file into the /usr/share/zabbix/conf directory and fix it the suitable permissions.

root@ubuntu-server:~# chmod 600 /usr/share/zabbix/conf/zabbix.conf.php

root@ubuntu-server:~# chown www-data:www-data /usr/share/zabbix/conf/zabbix.conf.php


May 22, 2011

Taking snapshots on KVM with LVM

In one article, we already saw how to take snapshots on KVM with libvirt. In this post, I am presenting another possible alternative to libvirt and it is by means of LVM (Logical Volume Management).

The idea is to create the virtual machine on a LV (Logical Volume) and afterwards, by using a feature called snapshot LV, to get an exact copy of that volume.

For my tests, I will utilize Kubuntu 11.04 (64 bits). First of all, I am going to set a LV so as to make up a virtual machine on it. Remember that if you want to set up a LV on a partition, this one must be marked as Linux LVM.

javi@kubuntu:~$ sudo fdisk -l
...
/dev/sdb1            7945        8992     8417280   8e  Linux LVM

In order to create a LV on a partition, we can follow the next steps. At the end, we will format the volume as ext4 (or another kind of format that you prefer).

javi@kubuntu:~$ pvcreate /dev/sdb1

javi@kubuntu:~$ vgcreate VolGroup00 /dev/sdb1

javi@kubuntu:~$ sudo lvcreate -n LogVol00 -L 2G VolGroup00

javi@kubuntu:~$ sudo mkfs.ext4 /dev/VolGroup00/LogVol00

The following figure shows a stage of the Virtual Machine Manager wizard, specifically the part where you have to pick the storage out. I have choosen the previous LV created. On this LV, I will make a new virtual machine (UbuntuServer_10.10, 2 GB virtual hard disk) which will be used before for the snapshotting.


At this point, we are ready to take a snapshot through LVM. Really easy.

javi@kubuntu:~$ sudo lvcreate -n UbuntuServer_10.10-22052011 -L 512M -s /dev/VolGroup00/LogVol00

By taking the snapshot with the preceding command, a new LV is created on the same VG (Volume Group) that LogVol01, that is to say, VolGroup00 in my case. For this reason, we must make sure that there is enough free space on the VG.

You have to take into account how a snapshot works. When you take a snapshot, the original virtual disk (LogVol01) is frozen and all changes are stored into the snapshot (UbuntuServer_10.10-22052011). So as to demonstrate it, we are going to display the LVs state once the snapshot has been taken.

javi@kubuntu:~$ sudo lvdisplay
--- Logical volume ---
LV Name                /dev/VolGroup00/LogVol00
VG Name                VolGroup00
LV UUID                Ag34Yq-990o-eyei-ClnF-OjCA-QltD-BrI39w
LV Write Access        read/write
LV snapshot status     source of
      /dev/VolGroup00/UbuntuServer_10.10-22052011 [active]
LV Status              available
# open                 0
LV Size                2,00 GiB
Current LE             512
Segments               1
Allocation             inherit
Read ahead sectors     auto
- currently set to     256
Block device           252:0

--- Logical volume ---
LV Name                /dev/VolGroup00/UbuntuServer_10.10-22052011
VG Name                VolGroup00
LV UUID                PSpJH0-ANEu-HW4W-YnLj-00Ta-g2Gz-WedRqi
LV Write Access        read/write
LV snapshot status     active destination for /dev/VolGroup00/LogVol00
LV Status              available
# open                 0
LV Size                2,00 GiB
Current LE             512
COW-table size         512,00 MiB
COW-table LE           128
Allocated to snapshot  0,00%
Snapshot chunk size    4,00 KiB
Segments               1
Allocation             inherit
Read ahead sectors     auto
- currently set to     256
Block device           252:1

The previous output indicates us that we can save up to 512 MB of data for our snapshot (COW-table size), and 0% of that space is being used (Allocated to snapshot). Then we are going to make a little change inside the virtual machine, for example to create a new file of 256 MB.

javi@ubuntu-server:~$ dd if=/dev/zero of=file bs=1M count=256

Now if we take a look at the LV state again, we can see that the 50% of the snapshot has already been allocated.

javi@kubuntu:~$ sudo lvdisplay /dev/VolGroup00/UbuntuServer_10.10-22052011
--- Logical volume ---
LV Name                /dev/VolGroup00/UbuntuServer_10.10-22052011
VG Name                VolGroup00
LV UUID                PSpJH0-ANEu-HW4W-YnLj-00Ta-g2Gz-WedRqi
LV Write Access        read/write
LV snapshot status     active destination for /dev/VolGroup00/LogVol00
LV Status              available
# open                 0
LV Size                2,00 GiB
Current LE             512
COW-table size         512,00 MiB
COW-table LE           128
Allocated to snapshot  50,45%
Snapshot chunk size    4,00 KiB
Segments               1
Allocation             inherit
Read ahead sectors     auto
- currently set to     256
Block device           252:1

And finally, if we want to bring back a specific snapshot, we must execute the following sentence.

javi@kubuntu:~$ sudo lvconvert --merge VolGroup00/UbuntuServer_10.10-22052011


May 14, 2011

Zabbix server installation on Ubuntu (I)

Some time ago I wrote an article about the installation of Zabbix server from its source code on CentOS.

Now I wanted to explain how to install it but this time, on Ubuntu. For my tests, I am going to use an Ubuntu Server 11.04 (64 bits) and Zabbix 1.8.5. For this infraestructure, we need MySQL and Apache. Let's start installing the necessary packages.

root@ubuntu-server:~# aptitude install build-essential apache2 mysql-server libmysqld-dev snmpd libsnmp-dev php5 php5-mysql php5-gd libcurl4-openssl-dev libiksemel-dev libopenipmi-dev libssh2-1-dev fping

root@ubuntu-server:~# mysql_secure_installation

As well it is important to run the mysql_secure_installation script in order to remove the anonymous user and the test database.

First of all we have to set up the database which will be used by Zabbix.

root@ubuntu-server:~# mysql -u root -p
...
mysql> CREATE DATABASE zabbix;
Query OK, 1 row affected (0.00 sec)

mysql> CREATE USER 'zabbix'@'localhost' IDENTIFIED BY 'xxxxxx';
Query OK, 0 rows affected (0.00 sec)

mysql> GRANT ALL PRIVILEGES ON zabbix.* TO 'zabbix'@'localhost';
Query OK, 0 rows affected (0.00 sec)

Once we have downloaded the Zabbix source code and decompressed it, we have just to compile and install it. If we want to have the Zabbix client, we must mark the --enable-agent parameter.

root@ubuntu-server:~/zabbix-1.8.5# ./configure --enable-agent  --enable-ipv6  --enable-server --with-mysql --with-libcurl --with-net-snmp --with-jabber --with-ssh2 --with-openipmi

root@ubuntu-server:~/zabbix-1.8.5# make ; make install

Next step is to create the needed directories and copy the configuration files into them. We must also add a new user (zabbix) to the system and dump the data and schemas within the Zabbix database.

root@ubuntu-server:~/zabbix-1.8.5# mkdir -p /etc/zabbix/alert.d /etc/zabbix/externalscripts /var/log/zabbix /var/run/zabbix /usr/share/zabbix

root@ubuntu-server:~/zabbix-1.8.5# useradd -r -d /var/run/zabbix -s /sbin/nologin zabbix

root@ubuntu-server:~/zabbix-1.8.5# cp -a misc/conf/zabbix_server.conf misc/conf/zabbix_agentd.conf /etc/zabbix/

root@ubuntu-server:~/zabbix-1.8.5# cp -r frontends/php/* /usr/share/zabbix

root@ubuntu-server:~/zabbix-1.8.5# chown zabbix:zabbix /var/run/zabbix /var/log/zabbix

root@ubuntu-server:~/zabbix-1.8.5# (echo "USE zabbix;" ; cat create/schema/mysql.sql ; cat create/data/data.sql ; cat create/data/images_mysql.sql) | mysql -h 127.0.0.1 -u zabbix --password=xxxxxx

Below we can see the minimum setting for both the server and client.

root@ubuntu-server:~# cat /etc/zabbix/zabbix_server.conf
...
# Zabbix server log file
LogFile=/var/log/zabbix/zabbix_server.log

# Zabbix server PID file
PidFile=/var/run/zabbix/zabbix_server.pid

# Zabbix database user and password
DBUser=zabbix
DBPassword=xxxxxx

# Location of alert scripts
AlertScriptsPath=/etc/zabbix/alert.d/

# Location of external scripts
ExternalScripts=/etc/zabbix/externalscripts


root@ubuntu-server:~# cat /etc/zabbix/zabbix_agentd.conf
...
# Zabbix client PID file
PidFile=/var/run/zabbix/zabbix_agentd.pid

# Zabbix client log file
LogFile=/var/log/zabbix/zabbix_agentd.log

# Allow remote commands from zabbix server
EnableRemoteCommands=1

# Maximum time for processing
Timeout=10

# System hostname
Hostname=ubuntu-server

# Zabbix server IP
Server=::ffff:127.0.0.1


root@ubuntu-server:~# chmod 600 /etc/zabbix/zabbix_server.conf

So as to be able to automatically start and stop the Zabbix agent and server, we have to create an Upstart file for this task. The Zabbix source code already provides the suitable script for Upstart, but I prefer to employ my own files (then you can see them - I have set some dependences which I consider important).

root@ubuntu-server:~# cat /etc/init/zabbix-server.conf
# Start zabbix server

pre-start script
if [ ! -d /var/run/zabbix ]; then
     mkdir -p /var/run/zabbix
     chown zabbix:zabbix /var/run/zabbix
fi
end script

start on started mysql
stop on stopping mysql
respawn
expect daemon
exec /usr/local/sbin/zabbix_server


root@ubuntu-server:~# cat /etc/init/zabbix-agent.conf
# Start zabbix agent

pre-start script
if [ ! -d /var/run/zabbix ]; then
     mkdir -p /var/run/zabbix
     chown zabbix:zabbix /var/run/zabbix
fi
end script

start on filesystem
stop on starting shutdown
respawn
expect daemon
exec /usr/local/sbin/zabbix_agentd

Now we can end the part of the Zabbix binary installation by registering the services and booting the processes up.

root@ubuntu-server:~# echo "zabbix-agent    10050/tcp  Zabbix Agent"   >> /etc/services
root@ubuntu-server:~# echo "zabbix-agent    10050/udp  Zabbix Agent"   >> /etc/services
root@ubuntu-server:~# echo "zabbix-trapper  10051/tcp  Zabbix Trapper" >> /etc/services
root@ubuntu-server:~# echo "zabbix-trapper  10051/udp  Zabbix Trapper" >> /etc/services


root@ubuntu-server:~# start zabbix-server

root@ubuntu-server:~# start zabbix-agent


May 8, 2011

Looking for web security breaches with Skipfish (II)

I am going to finish my article about looking for web security breaches with Skipfish. Once we have got a global sight of skipfish, I will run a test against a default MediaWiki installation.

First, I must create a dictionary although it will not be used in this test. One interesting option that I have chosen is -I, in order to only follow those URLs which match the string associated with the parameter.

javi@ubuntu-server:~/skipfish-1.86b$ cp -a dictionaries/complete.wl dictionary.wl

javi@ubuntu-server:~/skipfish-1.86b$ ./skipfish -W /dev/null -I http://192.168.122.104/mediawiki -o mediawiki_dir http://192.168.122.104/mediawiki

If you do not set this option and skipfish figures out more sites, it will scan them as well. In case you want to shut out a specific URL, you must establish it by means of the -X parameter.

During the crawling, skipfish shows information in real time about its analysis.

skipfish version 1.86b by <lcamtuf@google.com>                                                                                                                                                                                                                          
                                                                                                                                                                                                                                                                 
- 192.168.122.104 -                                                                                                                                                                                                                                                   
                                                                                                                                                                                                                                                                 
Scan statistics:                                                                                                                                                                                                                                                        
                                                                                                                                                                                                                                                                 
Scan time : 0:59:38.542                                                                                                                                                                                                                                           
HTTP requests : 34669 (10.4/s), 100769 kB in, 12487 kB out (31.6 kB/s)                                                                                                                                                                                                
Compression : 77967 kB in, 255451 kB out (53.2% gain)                                                                                                                                                                                                               
HTTP faults : 0 net errors, 0 proto errors, 0 retried, 0 drops                                                                                                                                                                                                      
TCP handshakes : 351 total (152.0 req/conn)                                                                                                                                                                                                                            
TCP faults : 0 failures, 0 timeouts, 3 purged                                                                                                                                                                                                                      
External links : 202 skipped                                                                                                                                                                                                                                           
Reqs pending : 18692                                                                                                                                                                                                                                                 
                                                                                                                                                                                                                                                                 
Database statistics:                                                                                                                                                                                                                                                    
                                                                                                                                                                                                                                                                 
  Pivots : 880 total, 462 done (52.50%)                                                                                                                                                                                                                          
In progress : 34 pending, 145 init, 221 attacks, 18 dict                                                                                                                                                                                                            
Missing nodes : 4 spotted                                                                                                                                                                                                                                             
Node types : 1 serv, 186 dir, 544 file, 16 pinfo, 76 unkn, 57 par, 0 val                                                                                                                                                                                           
Issues found : 11 info, 75 warn, 57 low, 0 medium, 128 high impact                                                                                                                                                                                                   
Dict size : 263 words (263 new), 4 extensions, 256 candidates

At the end of the process, skipfish will dump all the data collected within the mediawiki_dir directory (defined by the -o option), that in turn contains an HTML file (index.html) which allows to view the report generated.


In the previous outcome, skipfish has only found out severe problems related to HTTP PUTs accepted.

So as to be able to understand the results offered by skipfish and if you do not have deep knowledge about web security (like me), you might take a look at the Browser Security Handbook, written and maintained by the same author who is developing skipfish.

Other interesting parameter is for example -A, used for passing HTTP authentication credentials.

And finally, also point out that you can tune skipfish in networking or crawling scopes, through different options which allow to set up for instance parameters related to TCP connections or the depth of the analysis. For getting more information you can check the project documentation.


May 3, 2011

Kubuntu 11.04 Natty Narwhal

Here is the last version of Kubuntu, 11.04, also known as Natty Narwhal.


This release comes with important features such as a new kernel (2.6.38), the last KDE stable version (4.6.2), OpenOffice.org has been replaced by LibreOffice 3.3.2 (it is about time!), Upstart (0.9.7), LVM2 2.02.66 (very important for taking snapshots with LVM), Firefox 4.0.1 and so on.

It is significant to mention the new kernel, since fixes the Big Kernel Lock problem. Also point out the new Samba filesharing system, which allows easyly to share a directory in Dolphin, by configuring it through the Properties option.

My first impressions are very good, we have got a hardy and useful system, well worked out and really light.


Apr 24, 2011

Looking for web security breaches with Skipfish (I)

When we have to secure a system, it is very important to employ all the security tools we know, in order to protect it all the best we can. Skipfish is one of those applications which always has to be near.

It is a web security scanner, developed in C, which allows to discover lots of security holes on a web site by performing several kinds of tests:

  • High risk: SQL / PHP / XML / shell script injections, etc.

  • Medium risk: XSS (Cross-Site Scripting), CSS attacks, MIME type problems, etc.

  • Low risk: indexed directories, certificate problems, HTTP credentials, etc.

Due to it is written in pure C, it can reach an high performance: around 500 requests per second against targets located on Internet, about 2000 on local networks and more than 7000 on local hosts. Skipfish generates a sitemap with all the discovered paths, a summary of the document types and a set of security breaches.

I am going to try skipfish (1.86b version) out on an Ubuntu Server 10.10, by crawling a default MediaWiki installation. So as to install skipfish, we must fulfill some dependences on our system and then, compile it.

javi@ubuntu-server:~$ sudo aptitude install build-essential libssl-dev libidn11-dev

javi@ubuntu-server:~$ wget http://skipfish.googlecode.com/files/skipfish-1.86b.tgz

javi@ubuntu-server:~/skipfish-1.86b$ tar xvzf skipfish-1.86b.tgz

javi@ubuntu-server:~/skipfish-1.86b$ make

By typing the -h argument, we can take a look at all the available options by skipfish.

javi@ubuntu-server:~/skipfish-1.86b$ ./skipfish -h
skipfish version 1.86b by <lcamtuf@google.com>
Usage: ./skipfish [ options ... ] -o output_dir start_url [ start_url2 ... ]

Authentication and access options:

-A user:pass   - use specified HTTP authentication credentials
-F host=IP     - pretend that 'host' resolves to 'IP'
-C name=val    - append a custom cookie to all requests
-H name=val    - append a custom HTTP header to all requests
-b (i|f|p)     - use headers consistent with MSIE / Firefox / iPhone
-N             - do not accept any new cookies

Crawl scope options:

-d max_depth   - maximum crawl tree depth (16)
-c max_child   - maximum children to index per node (512)
-x max_desc    - maximum descendants to index per branch (8192)
-r r_limit     - max total number of requests to send (100000000)
-p crawl%      - node and link crawl probability (100%)
-q hex         - repeat probabilistic scan with given seed
-I string      - only follow URLs matching 'string'
-X string      - exclude URLs matching 'string'
-K string      - do not fuzz parameters named 'string'
-D domain      - crawl cross-site links to another domain
-B domain      - trust, but do not crawl, another domain
-Z             - do not descend into 5xx locations
-O             - do not submit any forms
-P             - do not parse HTML, etc, to find new links

Reporting options:

-o dir         - write output to specified directory (required)
-M             - log warnings about mixed content / non-SSL passwords
-E             - log all HTTP/1.0 / HTTP/1.1 caching intent mismatches
-U             - log all external URLs and e-mails seen
-Q             - completely suppress duplicate nodes in reports
-u             - be quiet, disable realtime progress stats

Dictionary management options:

-W wordlist    - load an alternative wordlist (skipfish.wl)
-L             - do not auto-learn new keywords for the site
-V             - do not update wordlist based on scan results
-Y             - do not fuzz extensions in directory brute-force
-R age         - purge words hit more than 'age' scans ago
-T name=val    - add new form auto-fill rule
-G max_guess   - maximum number of keyword guesses to keep (256)

Performance settings:

-g max_conn    - max simultaneous TCP connections, global (40)
-m host_conn   - max simultaneous connections, per target IP (10)
-f max_fail    - max number of consecutive HTTP errors (100)
-t req_tmout   - total request response timeout (20 s)
-w rw_tmout    - individual network I/O timeout (10 s)
-i idle_tmout  - timeout on idle HTTP connections (10 s)
-s s_limit     - response size limit (200000 B)
-e             - do not keep binary responses for reporting

Basically we can see that the skipfish command is made up by a set of options, an output directory for saving the results, and a series of URLs to be analyzed.

We have to take into account when skipfish is working out, it just tests those found links, but we also have the possibility to probe other URLs by means of a brute-force attack, by mixing names (index, doc, etc.) and extensions (pdf, bat, etc.). For this purpose, skipfish affords four dictionaries.

javi@ubuntu-server:~/skipfish-1.86b$ ls dictionaries/*.wl                                                                                                                                                                                                                     
dictionaries/complete.wl  dictionaries/extensions-only.wl  dictionaries/medium.wl  dictionaries/minimal.wl

By default, skipfish will treat to use a dictionary named skipfish.wl and situated on the work directory. Therefore either we can copy one of these dictionaries into the work directory under this name, or use the -W option to define the wordlist path or on the contrary, not to use a dictionary.

As the application is crawling, adds new words within the dictionary.