In the following tests we are going to set up a cluster using two Proxmox VE 1.7 servers (proxmox1.local, with IP address 192.168.122.211/24 and proxmox2.local, with IP address 192.168.122.212/24). The two Proxmox VE nodes will be two virtual machines running under KVM.
The cluster setting does not support web management, therefore the only way is to utilize the bash console (pveca command).
First of all, we have to define the master node (for instance proxmox1.local).
proxmox1:~# pveca -c
cluster master successfully created

proxmox1:~# pveca -l
CID----IPADDRESS----ROLE-STATE--------UPTIME---LOAD----MEM---DISK
1 : 192.168.122.211 M     A           00:13   0.00    16%    20%
Now we can add new slaves to the master. In our case, we will assign one only node to the cluster, proxmox2.local.
proxmox2:~# pveca -a -h 192.168.122.211
cluster node successfully created

proxmox2:~# pveca -l
CID----IPADDRESS----ROLE-STATE--------UPTIME---LOAD----MEM---DISK
1 : 192.168.122.211 M     A           00:23   0.00    18%    20%
2 : 192.168.122.212 N     A           00:23   0.00    17%    20%
If we open a web browser for the master node, we will be able to see in the main screen the cluster state.

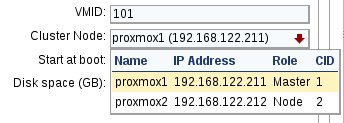
If we want to make a virtual machine, we will be able to choose the server where the virtual machine will be created.
Other useful orders provided by the pveca command are the next:
proxmox2:~# pveca --help
...
pveca -s [-h IP]     # sync cluster configuration from master (or IP)
pveca -d ID          # delete a node
pveca -m             # force local node to become master
pveca -i             # print node info (CID NAME IP ROLE)
And finally, we also have the option of live migration in order to move virtual machines between physical servers. This is an interesting characteristic because in this way, we can locate a virtual machine in other Proxmox node with better hardware, or simply for maintenance tasks.
For example, we are going to imagine that we have a CentOS 5 virtual machine installed on proxmox1.local, and we want to migrate it to proxmox2.local.

For this purpose, we have to open VM Manager, Virtual Machines section and select the Migrate tab. Then, we must select the source and target nodes and the VMID to migrate and press the migrate button (the virtual machine to be moved can be turned on).

No comments:
Post a Comment