Jul 25, 2011

Tuning Zabbix to improve its performance (I)

I am really looking forward to this article. I think it is going to be really useful for Zabbix administrators.

When you have to control a small group of machines, it is enough to install Zabbix (either from the repositories or the source code) and not modify any parameter. But when the number of monitored machines or items is very large, it is necessary to fit some values related to the operating system, the database and the Zabbix itself. Otherwise it is possible that your system acts up or the performance is not expected.

Bellow you can see the status of my Zabbix server at work (Zabbix 1.8.5 with MySQL 5.1, on Ubuntu 11.04 - 64 bits). I am monitoring around 430 devices, between servers and switches, and you can distinguish that the requeried server performance (new values per second) is really huge: 1687.


This configuration would not be possible with a Zabbix base installation. Also point out the hardware features of the server: 4 vCPUs (2.66 GHz), 8 GB RAM and 254 GB of storage.

First of all, we are going to take a look at several graphics of the server. Let's get started with the memory consumption during a typical day. The figure shows that the average available memory is around 1.73 GB and the system is not swapping.


Regarding the CPU, I have chosen a period of 6 hours so as to explain the concept of Housekeeping in Zabbix. As you can make out in the next chart, the normal use of CPU is about 20-25%, but each hour, there is a strong increment. This situation coincides with a rise of the Input/Output operations.


The Housekeeping is a task run by Zabbix which takes care of removing the unnecessary data of the history, alerts and alarms tables. Taking a look at the zabbix log, you can find out how many records are deleted from the database.

root@zbx01:~# egrep 'housekeeper|Deleted' /var/log/zabbix/zabbix_server.log
1599:20110719:230307.692 Executing housekeeper
1599:20110719:231127.392 Deleted 1522478 records from history and trends
1599:20110720:001127.393 Executing housekeeper
1599:20110720:001927.742 Deleted 1480673 records from history and trends
...

This procedure is configured by means of different parameters into the zabbix_server.conf file.

Through the load average graph, we can also appreciate this issue, where the load average (1 min) reaches maximum increases of 1.30.


And finally, the following graphic represents the status of the Zabbix cache during a week. Its values are rightly suited too.


In the next article, I will teach how to set up correctly the parameters related to the Linux kernel, MySQL and Zabbix.


Jul 17, 2011

Adding a VMware ESXi hypervisor to OpenNebula (III)

This is the last article about Adding a VMware ESXi hypervisor to OpenNebula. In this posting, we are going to build a virtual machine up on the esxi01 node.

To begin with, I am going to download a virtual image from the Virtual Appliances Marketplace, specifically an Ubuntu Server 8.04 LTS distribution (I will drop it off into the tmp directory).

oneadmin@frontend01:/tmp/ubuntu-server-8.04.1-i386$ ls -lh
total 529M
-rw-rw-r-- 1 oneadmin cloud  269 2008-07-05 17:59 README-vmware-image.txt
-rw------- 1 oneadmin cloud 8.5K 2008-07-05 17:59 ubuntu-server-8.04.1-i386.nvram
-rw------- 1 oneadmin cloud 144M 2008-07-05 17:59 ubuntu-server-8.04.1-i386-s001.vmdk
-rw------- 1 oneadmin cloud 207M 2008-07-05 17:59 ubuntu-server-8.04.1-i386-s002.vmdk
-rw------- 1 oneadmin cloud 177M 2008-07-05 17:59 ubuntu-server-8.04.1-i386-s003.vmdk
-rw------- 1 oneadmin cloud 1.8M 2008-07-05 17:59 ubuntu-server-8.04.1-i386-s004.vmdk
-rw------- 1 oneadmin cloud  64K 2008-07-05 17:59 ubuntu-server-8.04.1-i386-s005.vmdk
-rw------- 1 oneadmin cloud  592 2008-07-05 17:59 ubuntu-server-8.04.1-i386.vmdk
-rw------- 1 oneadmin cloud    0 2008-07-05 17:59 ubuntu-server-8.04.1-i386.vmsd
-rwxr-xr-x 1 oneadmin cloud 1.1K 2008-07-05 17:59 ubuntu-server-8.04.1-i386.vmx

Then I am going to register the image in OpenNebula. For this purpose, it is necessary to define an image template.

oneadmin@frontend01:/tmp/ubuntu-server-8.04.1-i386$ cat ubuntu-server-8.04.img
NAME        = "Ubuntu Server 8.04"
DESCRIPTION = "Ubuntu Server 8.04 LTS (32 bits)"

oneadmin@frontend01:/tmp/ubuntu-server-8.04.1-i386$ onevmware register --disk-vmdk ubuntu-server-8.04.1-i386.vmdk --disk-flat ubuntu-server-8.04.1-i386-s001.vmdk,ubuntu-server-8.04.1-i386-s002.vmdk,ubuntu-server-8.04.1-i386-s003.vmdk,ubuntu-server-8.04.1-i386-s004.vmdk,ubuntu-server-8.04.1-i386-s005.vmdk ubuntu-server-8.04.img

What happens now? We have a virtual image ready to be used. This image has been stored into the images directory.

oneadmin@frontend01:~$ oneimage list
ID     USER                 NAME TYPE              REGTIME PUB PER STAT  #VMS
 0 oneadmin   Ubuntu Server 8.04   OS   Jul 02, 2011 10:34  No  No  rdy     0

oneadmin@frontend01:~$ ls -l var/images/0ffb8867916a29e279e5ac2374833faa84fe5193/
total 540740
-rw-rw---- 1 oneadmin cloud       592 2011-07-02 12:34 disk.vmdk
-rw-rw---- 1 oneadmin cloud 150339584 2011-07-02 12:34 ubuntu-server-8.04.1-i386-s001.vmdk
-rw-rw---- 1 oneadmin cloud 216268800 2011-07-02 12:35 ubuntu-server-8.04.1-i386-s002.vmdk
-rw-rw---- 1 oneadmin cloud 185204736 2011-07-02 12:36 ubuntu-server-8.04.1-i386-s003.vmdk
-rw-rw---- 1 oneadmin cloud   1835008 2011-07-02 12:37 ubuntu-server-8.04.1-i386-s004.vmdk
-rw-rw---- 1 oneadmin cloud     65536 2011-07-02 12:37 ubuntu-server-8.04.1-i386-s005.vmdk

What is the next step? Easy, to make up a virtual network so as to be able to connect our future virtual machine on it. In my example, I have created a simple ranged network called ESXi Network. You can review the different parameters by taking a look at the exposed link in this paragraph.

oneadmin@frontend01:~$ mkdir templates ; cd templates

oneadmin@frontend01:~/templates$ cat esxi.net
NAME            = "ESXi Network"
TYPE            = RANGED
PUBLIC          = NO
BRIDGE          = "VM Network"
NETWORK_ADDRESS = 192.168.1.160
NETWORK_SIZE    = 16
NETMASK         = 255.255.255.0
GATEWAY         = 192.168.1.1
DNS             = 194.30.0.1

oneadmin@frontend01:~/templates$ onevnet create esxi.net

oneadmin@frontend01:~/templates$ onevnet list
ID USER     NAME              TYPE BRIDGE P #LEASES
 0 oneadmin ESXi Network    Ranged VM Net N       0

And finally, we must just set up an instance template in order to declare the features of our virtual machine. Also point out that a virtual machine is known as instance as well.

oneadmin@frontend01:~/templates$ cat ubuntu-server01.vm
NAME   = "UbuntuServer-01"
CPU    = 1
MEMORY = 512

DISK   = [ IMAGE  = "Ubuntu Server 8.04",
           TARGET = hda ]

NIC    = [ NETWORK = "ESXi Network" ]

oneadmin@frontend01:~/templates$ onevm create ubuntu-server01.vm

oneadmin@frontend01:~/templates$ onevm list
ID     USER     NAME STAT CPU     MEM        HOSTNAME        TIME
 0 oneadmin UbuntuSe pend   0      0K                 00 00:00:07

We can see in the output of the preceding onevm list command that, the state of the instance is pend (pending), that is to say, it is waiting to be deployed on a hypervisor, in my case, esxi01. So let's go.

oneadmin@frontend01:~/templates$ onevm deploy 0 0

oneadmin@frontend01:~/templates$ onevm list
ID     USER     NAME STAT CPU     MEM        HOSTNAME        TIME
 0 oneadmin UbuntuSe prol   0      0K          esxi01 00 00:00:36

oneadmin@frontend01:~/templates$ onevm list
ID     USER     NAME STAT CPU     MEM        HOSTNAME        TIME
 0 oneadmin UbuntuSe boot   0      0K          esxi01 00 00:00:50

oneadmin@frontend01:~/templates$ onevm list
ID     USER     NAME STAT CPU     MEM        HOSTNAME        TIME
 0 oneadmin UbuntuSe runn   0      0K          esxi01 00 00:01:07

When we treat to deploy the virtual machine on the node, its first state is prol (prolog), then it reaches a boot state (booting), and lastly, runn (running), once the instance has been started up.


Jul 9, 2011

Adding a VMware ESXi hypervisor to OpenNebula (II)

Let's go ahead with the development of the cloud computing infraestructure based on OpenNebula by adding a VMware ESXi hypervisor. In the previous article, we saw how to configure a VMware vSphere node and now, we are going to set up the needed part on frontend01.

In order to manage the VMware node from OpenNebula, it is necessary to install libvirt on frontend01, and on top of all that, this software must be compiled with the ESX support. In this way, you cannot use the corresponding package located in the Ubuntu repositories. I am going to utilize the 0.9.2 version of libvirt.

root@frontend01:~# aptitude install libgnutls-dev libdevmapper-dev libcurl4-gnutls-dev python-dev libnl-dev libapparmor-dev

root@frontend01:/tmp# wget http://libvirt.org/sources/libvirt-0.9.2.tar.gz

root@frontend01:/tmp# tar xvzf libvirt-0.9.2.tar.gz ; cd libvirt-0.9.2

root@frontend01:/tmp/libvirt-0.9.2# ./configure --with-esx --with-apparmor --sysconfdir=/etc --libdir=/usr/lib --sbindir=/usr/sbin --datarootdir=/usr/share --localstatedir=/var --libexecdir=/usr/lib/libvirt

root@frontend01:/tmp/libvirt-0.9.2# make ; make install

I have also compiled the source code with AppArmor support, so I have had to move the required files.

root@frontend01:/tmp/libvirt-0.9.2# mkdir -p /etc/apparmor.d/libvirt

root@frontend01:/tmp/libvirt-0.9.2# cp -a examples/apparmor/usr.* /etc/apparmor.d/
root@frontend01:/tmp/libvirt-0.9.2# cp -a examples/apparmor/TEMPLATE /etc/apparmor.d/libvirt/
root@frontend01:/tmp/libvirt-0.9.2# cp -a examples/apparmor/libvirt-qemu /etc/apparmor.d/abstractions/

root@frontend01:/tmp/libvirt-0.9.2# cat /etc/apparmor.d/usr.sbin.libvirtd
...
owner /srv/cloud/one/var/** rw,
}

root@frontend01:/tmp/libvirt-0.9.2# /etc/init.d/apparmor restart

Next step is to download and install the VMware Drivers Addon (version 2.2.0 in my case). This wrapper enables the communication between OpenNebula and VMware ESXi through libvirt. This operation must be effected by means of the oneadmin user.

When you run the install.sh script and if everything went well, you will get a message about a specific code that you have to add into the oned.conf file.

oneadmin@frontend01:/tmp$ wget http://dev.opennebula.org/attachments/download/350/vmware-2.2.0.tar.gz

oneadmin@frontend01:/tmp$ tar xvzf vmware-2.2.0.tar.gz ; cd vmware-2.2.0

oneadmin@frontend01:/tmp/vmware-2.2.0$ ./install.sh
VMWare Drivers Addon successfully installed

# After the installation, please add the following to your oned.conf file
# and restart OpenNebula to activate the VMware Drivers Addon

#-------------------------------------------------------------------------------
#  VMware Driver Addon Virtualization Driver Manager Configuration
#-------------------------------------------------------------------------------
VM_MAD = [
name       = "vmm_vmware",
executable = "one_vmm_sh",
arguments  = "vmware",
default    = "vmm_sh/vmm_sh_vmware.conf",
type       = "vmware" ]
#-------------------------------------------------------------------------------

#-------------------------------------------------------------------------------
#  VMware Driver Addon Information Driver Manager Configuration
#-------------------------------------------------------------------------------
IM_MAD = [
name       = "im_vmware",
executable = "one_im_sh",
arguments  = "vmware" ]
#-------------------------------------------------------------------------------

#-------------------------------------------------------------------------------
# VMware Driver Addon Transfer Manager Driver Configuration
#-------------------------------------------------------------------------------
TM_MAD = [
name       = "tm_vmware",
executable = "one_tm",
arguments  = "tm_vmware/tm_vmware.conf" ]
#-------------------------------------------------------------------------------

Due to there is a mistake in the install.sh script, you must execute manually the following two orders.

oneadmin@frontend01:/tmp/vmware-2.2.0$ mkdir -p $ONE_LOCATION/var/remotes/im/vmware.d && cp -r im/remotes/* $ONE_LOCATION/var/remotes/im/vmware.d

oneadmin@frontend01:/tmp/vmware-2.2.0$ mkdir -p $ONE_LOCATION/var/remotes/vmm/vmware && cp -r vmm/remotes/* $ONE_LOCATION/var/remotes/vmm/vmware

This problem causes that you cannot start the VMware node up and the log file will show the next error.

oneadmin@frontend01:~$ cat var/oned.log
...
[ONE][E]: syntax error, unexpected $end, expecting VARIABLE at line 2, columns 1:2

Before restarting OpenNebula, you must type the user and password used to access to esxi01 and include a line into the sudoers file, so that OpenNebula may properly set some permissions.

oneadmin@frontend01:~$ cat etc/vmwarerc
...
USERNAME      = "oneadmin"
PASSWORD      = "xxxxxx"

root@frontend01:~# cat /etc/sudoers
...
oneadmin ALL=NOPASSWD:/srv/cloud/one/share/hooks/fix_owner_perms.sh ""

root@frontend01:~# /etc/init.d/opennebula restart

So as to check the correct installation, run the following command. Thereby, you will be able to obtain the physical resources of the managed node.

oneadmin@frontend01:~$ lib/remotes/im/run_probes vmware esxi01
/srv/cloud/one/lib/ruby/vmwarelib.rb:26: warning: already initialized constant ONE_LOCATION
/srv/cloud/one/lib/ruby/vmwarelib.rb:32: warning: already initialized constant RUBY_LIB_LOCATION
HYPERVISOR=vmware TOTALCPU=100 CPUSPEED=3001 TOTALMEMORY=2096460 FREEMEMORY=1677168

Now if you want to add the VMware vSphere node configured to OpenNebula, you can execute the next order.

oneadmin@frontend01:~$ onehost create esxi01 im_vmware vmm_vmware tm_vmware

oneadmin@frontend01:~$ onehost list
ID NAME              CLUSTER  RVM   TCPU   FCPU   ACPU    TMEM    FMEM STAT
0  esxi01            default    0    100    100    100      2G    1.6G   on


Jul 2, 2011

Adding a VMware ESXi hypervisor to OpenNebula (I)

This is the first article about how to add a VMware vSphere hypervisor to OpenNebula. In the two previous entries (I and II), I carried out the installation of OpenNebula on Ubuntu.

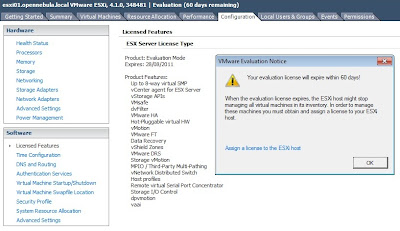
First of all, it is very important to underline that OpenNebula can only work with VMware vSphere hypervisor if it has got an evaluation license (60 days) or a standard, advanced, enterprise or enterprise plus license. If you opt for a free license, this mode lacks many remote commands and just supports the read-only API.


For instance, if you try to remotely define a virtual machine, you will get an error as the follows.

oneadmin@frontend01:~$ virsh -c esx://esxi01/?no_verify=1
Enter username for esxi01 [root]: oneadmin
Enter oneadmin's password for esxi01:
Welcome to virsh, the virtualization interactive terminal.

Type:  'help' for help with commands
     'quit' to quit

virsh #  define /srv/cloud/one/var/0/deployment.0
error: Failed to define domain from /srv/cloud/one/var/0/deployment.0
error: internal error HTTP response code 500 for call to 'RegisterVM_Task'. Fault: ServerFaultCode - fault.RestrictedVersion.summary

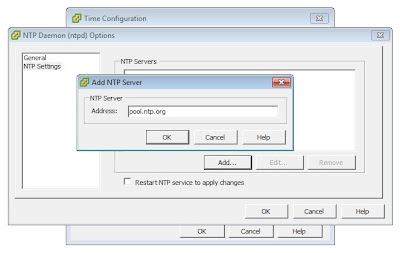
After this explanation, let's get started by configuring the ntp daemon so that this hypervisor will be synchronized with the rest of nodes which make up the cloud computing infraestructure. Remember that the VMware vSphere ESXi version which I am going to use for my tests is the 4.1.

So as to set up a NTP server (in my case, a public NTP server such as pool.ntp.org), we must go to Configuration, Time Configuration and press the Properties link.


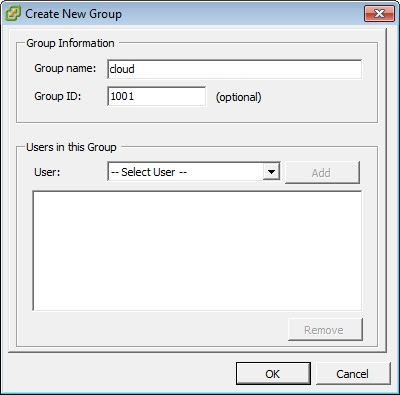
Next step is to aggregate a new group named cloud, with ID 1001, by clicking with the right button of the mouse on Local Users & Groups, Groups tab and pressing the Add command.


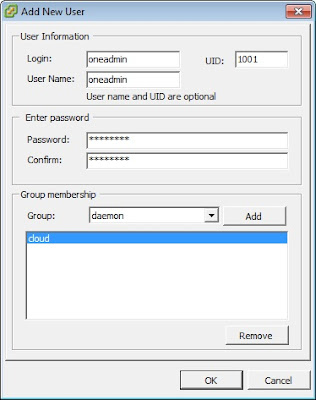
Then you have to create a new user named oneadmin, by making the same operation, but this time on the Users tab section. This user have to belong to the cloud group and also have the 1001 ID.


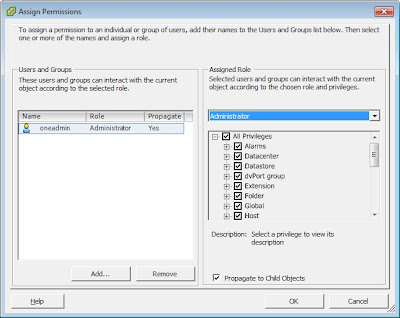
In addition, this new user must have full privilegies on the node. Therefore, we have to click with the right button of the mouse over our hypervisor, choose the Add Permission option and select the fields that you may see in the following figure.


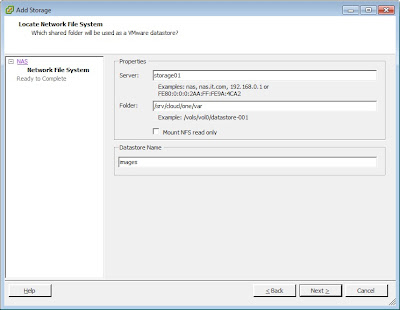
And finally, we have to mount the shared storage exported by the storage01 machine. In order to realize this task, you must go to Configuration, Storage and press on the Add Storage link. In this way, a wizard will be popped up which will allow us to mount the remote storage.


In the first screen, you must pick out the Network File System storage type and then, fulfill the fields showed in the preceding image. Note that we are just importing the /srv/cloud/one/var directory, because in this folder will be stored the virtual machines. Also say that I have called the datastore images.