First of all, it is very important to underline that OpenNebula can only work with VMware vSphere hypervisor if it has got an evaluation license (60 days) or a standard, advanced, enterprise or enterprise plus license. If you opt for a free license, this mode lacks many remote commands and just supports the read-only API.
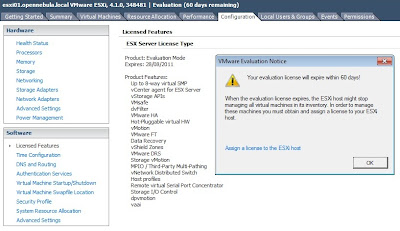
For instance, if you try to remotely define a virtual machine, you will get an error as the follows.
oneadmin@frontend01:~$ virsh -c esx://esxi01/?no_verify=1
Enter username for esxi01 [root]: oneadmin
Enter oneadmin's password for esxi01:
Welcome to virsh, the virtualization interactive terminal.

Type:  'help' for help with commands
     'quit' to quit

virsh #  define /srv/cloud/one/var/0/deployment.0
error: Failed to define domain from /srv/cloud/one/var/0/deployment.0
error: internal error HTTP response code 500 for call to 'RegisterVM_Task'. Fault: ServerFaultCode - fault.RestrictedVersion.summary
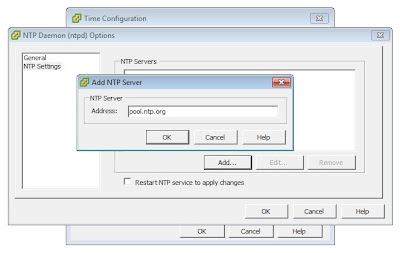
After this explanation, let's get started by configuring the ntp daemon so that this hypervisor will be synchronized with the rest of nodes which make up the cloud computing infraestructure. Remember that the VMware vSphere ESXi version which I am going to use for my tests is the 4.1.
So as to set up a NTP server (in my case, a public NTP server such as pool.ntp.org), we must go to Configuration, Time Configuration and press the Properties link.
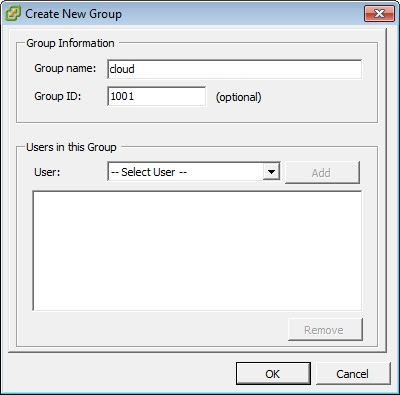
Next step is to aggregate a new group named cloud, with ID 1001, by clicking with the right button of the mouse on Local Users & Groups, Groups tab and pressing the Add command.
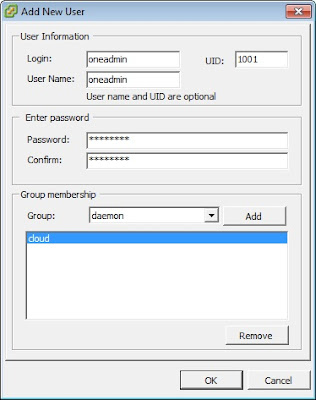
Then you have to create a new user named oneadmin, by making the same operation, but this time on the Users tab section. This user have to belong to the cloud group and also have the 1001 ID.
In addition, this new user must have full privilegies on the node. Therefore, we have to click with the right button of the mouse over our hypervisor, choose the Add Permission option and select the fields that you may see in the following figure.
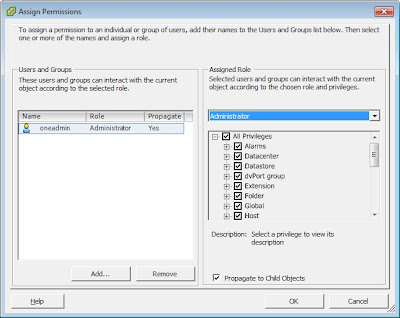
And finally, we have to mount the shared storage exported by the storage01 machine. In order to realize this task, you must go to Configuration, Storage and press on the Add Storage link. In this way, a wizard will be popped up which will allow us to mount the remote storage.
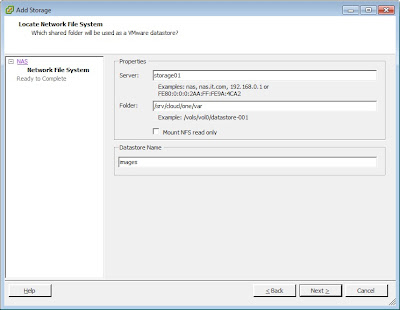
In the first screen, you must pick out the Network File System storage type and then, fulfill the fields showed in the preceding image. Note that we are just importing the /srv/cloud/one/var directory, because in this folder will be stored the virtual machines. Also say that I have called the datastore images.

Great article.
ReplyDeleteI wonder how you install Ruby on ESXi?
Please reply to cxyzhang@gmail.com
Thank you very much.
There is no way. VMware ESXi is a closed platform and you cannot install Ruby on it.
ReplyDeleteGreat series of articles.. do you think it would be possible to install opennebula in a vm inside esx, and to control esx from there?
ReplyDeleteSure, in fact my opennebula articles are based on VMs under VMware.
DeleteThis comment has been removed by the author.
Delete